Microsoft 365 is essential for collaboration but also creates one of the largest data risk surfaces in any organization. Beyond external threats, everyday file misuse, overexposure, or poor sharing practices can lead to data leaks, compliance issues, and breaches. This guide explains how to detect and manage high-risk files and high-risk file sharing in M365 using native tools like Microsoft Purview, Defender, Entra, SharePoint, and OneDrive, plus how CoreView can create needed visibility, automation, and cyber resilience across your environment.
Executive summary
Microsoft 365’s vast collaboration environment creates an equally vast attack surface, both from external threats and internal mismanagement, oversharing, and misuse of sensitive data. High-risk files containing PII, financials, or intellectual property, and high-risk sharing practices, such as public links or excessive permissions, pose significant exposure risks. This guide details how to detect and mitigate those risks using Microsoft’s native tools like Purview, Defender, Entra, and SharePoint governance. It also shows how platforms like CoreView enhance visibility, automate remediation, and strengthen resilience. By uniting detection, governance, and automation, organizations can protect critical data and reduce breach, compliance, and reputational risks.
Microsoft 365 represents a vast risk surface, but not just from hostile external attacks but also through the mismanagement, sharing, or misuse of sensitive files. A file containing personally identifiable information (PII), trade secrets, proprietary data, financial data, or regulated health data becomes a high-risk file when its contents, location, permissions, or sharing pathways create a possibility of exposure, leakage, or exfiltration.
Meanwhile, high-risk file sharing refers to scenarios in which files, even innocuous ones, are shared in insecure, ungoverned, or excessive ways that increase exposure (for instance, public links, broad permissions, external guests, or uncontrolled sync).
For organizations using Microsoft 365 (M365), the platform offers a broad range of native tools, including Microsoft Purview (Information Protection and DLP), Defender (Office 365, Cloud Apps), SharePoint governance, Entra control, OneDrive management, and more, to detect, monitor, and mitigate such risks. However, in large, complex environments, native tools may lack centralized correlation, automation, or advanced prioritization capabilities. This is where third-party platforms like CoreView can augment detection and response, providing cross-tenant visibility, alerting, analytics, and remediation workflows.
This article covers:
File sharing is one of the most common things people do when using and collaborating with Microsoft 365, but file-sharing security isn’t a consideration most users think about when they share. Let’s examine and define what constitutes high-risk files and file sharing as well as address best practices for managing files and access to them.
Defining High-Risk Files
Before diving into detection methods, let’s define what M365 high-risk files are.
Characteristics of High-Risk Files
In a Microsoft 365 context, a file may become high risk due to one or more of the following characteristics:
- Sensitive content: The file contains regulated data (e.g. PCI, PHI, PII, intellectual property, proprietary formulas, trade secrets) or internal data that would cause major damage if leaked.
- High exposure pathways: The file is stored in locations with lax controls (public SharePoint, external guest sites, unmanaged Teams, shadow IT locations).
- Abnormal usage patterns: The file is accessed, downloaded, or modified by an unusual number of users or from multiple geographies or IPs.
- Weak permissions or sharing settings: The file is broadly shareable or uses permissive access (Everyone, “Anyone with link,” external users, nested groups, legacy permissions).
- Frequent change or versioning: It is modified often or snapshots are proliferated (leading to “file sprawl”).
- Unencrypted or unlabeled: The file has no sensitivity labels or encryption or uses weak rights management.
- Linked via external applications or APIs: External tools (bots, integrations, connectors) have access or are used to distribute or replicate the file.
Some risk frameworks also call for file integrity monitoring (to detect unauthorized changes or tampering) and file access anomaly detection (e.g., abnormally large downloads). For M365, the notion of M365 high-risk file integrity monitoring and M365 high-risk file protection applies — monitoring not only content but also metadata, access, and movement.
Why High-Risk Files Matter: The Data & Research
But why focus on files and file sharing? Because every time a file is opened up to more collaborators, the more insecure your M365 environment. Your files can be targets for various types of attacks – the more valuable the file, the higher value the target. But even innocuous files can be a way for attackers to make their way in to your organization. Improper file sharing may not seem like that big of a deal, but when you consider all the ways access to shared files can be exploited, it’s important to think carefully about how and what you share.
In CoreView’s 2025 State of Microsoft 365 Security Report, it’s noted that within a single month Microsoft logged 176,000 configuration tampering events. These show how attackers try to manipulate governance and oversight controls (though not all are at the file level, it underscores internal risk).
In a Vectra survey of over 1,000 security professionals, 71% of Microsoft 365 deployments had experienced at least one account takeover, with an average of seven successful takeovers. Attackers inside a tenant can then target file exfiltration.
IBM’s 2024 Cost of a Data Breach report places the cost of an average data breach at nearly USD five million, with brand damage lasting for many years thereafter. This is why data loss prevention (DLP) is such a critical component of securing sensitive information and files. Microsoft repeatedly emphasizes that DLP policies are key to preventing leakage of sensitive files across Exchange, SharePoint, OneDrive, Teams, endpoints, and others. Yet many organizations need additional tooling to close gaps in cloud coverage, file-type handling, and so on.
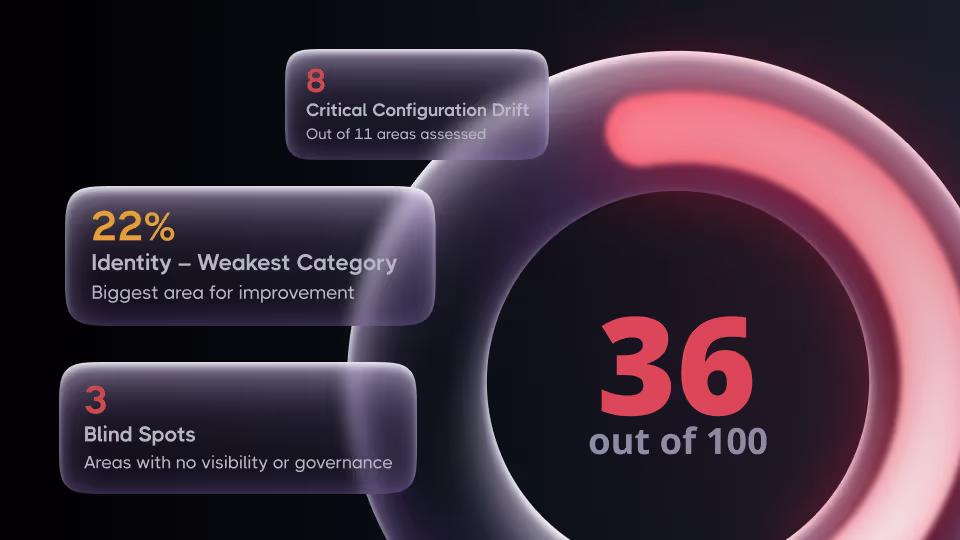
We’ve identified high-risk files and file sharing as one of the critical pillars of a mature Microsoft 365 cyber resilience strategy.
Check your cyber resilience maturity
The risk is not hypothetical – high-risk files are actively exfiltrated, misshared, or manipulated in compromised tenants, which can lead to data breaches, compliance violations, and reputational damage. How can this be prevented through active detection?
How to Detect High-Risk Files Using M365 Native Tools
Microsoft’s native toolset offers a number of ways to detect high-risk files.
1. Detection via basic Office 365 / M365 Audit Logs & Content Search
How-to:
- Enable unified audit logging (if not already in place). In the Microsoft Purview Portal, under Audit > Audit log settings, ensure audit is enabled for all users and workloads.
- Use Content Search (via Microsoft Purview) to search across mailboxes, SharePoint, OneDrive for keywords or patterns indicative of sensitive content.
- In the Microsoft Purview compliance portal, go to Information protection > Activity explorer to see user interactions with sensitive content.
- Use Alert Policies (in the Security portal) based on specific file, e.g., alert when a file with certain keywords is shared externally or downloaded.
Best Practices & Notes:
- Filter out benign activity (e.g,. bulk backup or automated scripts) to reduce noise.
- Retain audit logs for a sufficient duration, e.g. for at least 90–180 days (or longer for compliance). M365 default is 180 days.
- Integrate audit logs with your SIEM (e.g. Microsoft Sentinel) for correlation and alerting.
- Use least privilege on who can access audit logs, as they themselves are sensitive.
This simple logging-based approach gives you a quick baseline about what has been happening and forms the basis for other detection techniques.
2. Detection via Microsoft Purview Information Protection and DLP
Purview (formerly Microsoft Information Protection + DLP) is a central mechanism by which you can detect sensitive content within files, classify it, and enforce controls.
a) Create Sensitive Information Types (SITs)
How-to:
- In the Microsoft Purview compliance portal, navigate to Classifiers > Sensitive info types.
- Use existing built-in sensitive types (e.g. credit card numbers, SSNs, medical IDs), or define custom SITs using:
- Regex / pattern matching
- Keyword lists
- Custom patterns or dictionaries
- Test your new SIT by running content searches or “simulate matches” on file sets to see coverage.
- Adjust the confidence threshold or instance count to fine-tune false positives.
Best Practices & Notes:
- Start with a handful of high-impact SITs rather than excessive ones to reduce noise.
- Use test mode / simulation before full enforcement.
- Periodically review and tune SIT rules based on false positives / false negatives.
- Collaborate with business owners to validate false positives or false negative cases.
b) Apply Sensitivity Labels
How-to:
- In Microsoft Purview, go to Information protection > Sensitivity Labels.
- Define labels that map to sensitivity categories (e.g. Public, Internal, Confidential, Highly Confidential).
- Configure label scopes (for email, files, or both), and configure encryption, visual marking, content marking as needed.
- Optionally enable auto-labeling rules which detect SITs (or classifiers) and apply labels automatically.
- Monitor label usage via Information protection > Reports in Purview.
Best Practices & Notes:
- Use label inheritance or label policies to subtype sensitivity gradually.
- Start with user-driven labeling (where users choose), then gradually shift to auto-labeling rules as confidence increases.
- Educate users about what each label means in terms of sharing, downloading, and external sharing.
- Tie label usage into DLP policies (so that e.g. “Highly Confidential” files trigger stricter checks).
c) Configure Data Loss Prevention (DLP) Policies
How-to:
- In Microsoft Purview, go to Data loss prevention > Policies.
- Click + Create policy, using either templates or custom policy.
- Scope the policy to the locations (Exchange, SharePoint, OneDrive, Teams, endpoints) where files may exist.
- Add conditions based on SIT matches, sensitivity label, or other metadata, e.g. “Content contains credit card number” or “Content is labeled Highly Confidential.”
- Configure actions / protection (block, restrict sharing, encrypt, override with justification, or just alert).
- Optionally enable user notifications / policy tips so users see inline formatting or warnings.
- Configure incident reporting and alerting, to send alert emails to admins or compliance officers when violations occur.
- Tune the policy in test / audit mode before full enforcement.
- Use the DLP alerts dashboard in Purview to monitor matches and incidents.
- Optionally, connect DLP alerts to Microsoft Defender XDR or Microsoft Sentinel for incident correlation.
Best Practices & Notes:
- Use an incremental approach — start with “monitor only / alert only” mode, then move to partial blocks, then full block.
- Exclude known exceptions (e.g. automatically generated reports) to reduce noise where safe.
- Use Adaptive Protection (if available) to dynamically adjust behavior based on risk level (Insider risk, unusual behavior).
- Periodically review DLP alerts, false positives/negatives, and adjust rules as needed.
- Educate users with policy tips before enforcing blocking, so that they understand why an action is prevented.
- For endpoints, use Endpoint DLP capability to monitor files on devices (Windows/macOS) and take protective actions locally.
With Purview DLP properly configured, you gain proactive detection (and optionally enforcement) of high-risk file content across the M365 ecosystem.
3. How to Detect High-Risk Files Using the Microsoft Defender Portal
Microsoft’s Defender stack (especially Defender for Office 365, Defender for Cloud Apps, and general Defender XDR) brings threat and content-based detection to file traffic and attachments you receive.
a) Enable and Leverage Safe Attachments
How-to:
- In the Microsoft 365 Defender portal, go to Email & collaboration > Policies & rules > Safe Attachments.
- Configure policies so that all attachments (or attachments in certain scenarios) you receive are scanned in dynamic scanning / detonation mode.
- Enable “Dynamic Delivery / Drop” options, where suspicious attachments are quarantined until the scan is complete.
- Use Advanced Threat Protection (ATP) capabilities to flag malicious or suspicious file types (macros, executables, etc.).
- Monitor threat explorer / real-time detections on attachments for trends, spikes, or anomalies.
Best Practices & Notes:
- Block obviously dangerous file types (e.g. .exe, .js) in email attachments as applicable.
- Use dynamic delivery so that legitimate emails are not unduly delayed.
- Combine Safe Attachments with Safe Links, anti-phishing, and link scanning for holistic coverage.
- Periodically review the logs (via Threat Explorer) to detect recurring malicious file patterns or sender behavior.
This ensures that high-risk files entering you receive via email are caught before a problem can arise. After all, file sharing works two ways – you want to be careful with what you share, but you also want to be careful about the files you receive and open.
4. How to Detect High-Risk Files Using Microsoft Defender for Cloud Apps (aka MCAS / Defender for Cloud Apps)
Defender for Cloud Apps (the CASB component) is crucial for discovering and policing file activity across cloud applications.
How-to:
- In the Microsoft Defender for Cloud Apps portal, enable necessary connectors (e.g. Office 365 SharePoint, OneDrive, Teams) and enable continuous logs or real-time activity monitoring.
- Use cloud Discovery to monitor shadow IT and detect applications that are reading or writing files outside control.
- Create activity policies to flag or alert on suspicious file operations, such as:
- Downloading large volumes of files
- File sharing to external domains / unallowed domains
- File deletion spikes
- Anomalous file accesses (e.g., many users accessing a specific file)
- Use governance actions in Defender for Cloud Apps to remediate policy violations automatically (e.g. restrict access, block sharing, revoking sessions).
- Monitor the Alert queue / investigation queue for flagged file activity.
Best Practices & Notes:
- Use anomaly detection templates (built into Cloud Apps) to find unusual file download spikes or user behavior.
- Regularly tune the policy thresholds (e.g., how many downloads per user per time period) to reduce false positives.
- Combine with DLP, e.g., if a file is labeled Highly Confidential, policy can be stricter.
- Use the Information Protection integration to tie file content classification into CASB violation logic.
- Periodically audit apps that have file-level access and revoke permissions not needed.
With Defender for Cloud Apps, you gain visibility into cloud-level file activity, especially cross-app and exfiltration attempts.
5. How to Detect High-Risk Files Using SharePoint’s Data Access Governance (requires additional licensing)
SharePoint and OneDrive include capabilities for Data Access Governance (DAG), which can help identify risky file access and sharing.
How-to:
- In the SharePoint admin center, go to Reports > Data access governance
- Run a DAG report (Data Access Governance report) that identifies:
- Site permissions across your organization
- In SharePoint Site Permissions, review guest users, anonymous links, external sharing settings, and nested group permissions.
- For each risky folder / file identified, escalate to review or remediate permissions.
Best Practices & Notes:
- Run DAG reports nightly or weekly, depending on scale.
- Prioritize high-risk files (by number of accesses, number of external users, or file size).
- Use automation to randomly verify permissions and sharing status.
- Use sensitivity labels / file-level protection on the most critical libraries to mitigate file-level risk even if sharing is broad.
- Enforce least privilege on site-level access and guest access.
SharePoint DAG is essential to correlate file-level exposure and real-world usage, so it can help pinpoint which files truly merit focus.
Defining High-Risk File Sharing
Just as there are high-risk files, there are high-risk file sharing practices. A file with only low-sensitivity content might still become dangerous if shared in unsafe ways.
Characteristics of High-Risk File Sharing
High-risk sharing often exhibits the following traits:
- Anonymous or public links (“Anyone with link”) granting broad access.
- External user/guest access where the recipient is not in your tenant or is unmanaged.
- Overly permissive permissions (edit, full control) when only view is needed.
- Nested group complexity making permission pathways opaque.
- Excessive sharing depth when files are shared broadly across many teams or sites.
- Share propagation with linked shortcuts across sites, multiple copies.
- Lack of expiration / revocation when shared links never expire or are not cleaned up.
- Sharing to untrusted or high-risk domains, e.g., public email, free domains, unknown domains.
In the M365 environment, you might call this M365 high-risk file sharing, and this requires considering for a high-risk file sharing detection policy and high-risk file sharing protection.
Because even a relatively benign file, if shared broadly or anonymously, becomes a vector for phishing, reconnaissance, or data leakage, vigilant detection of high-risk sharing is essential.
How to Detect High-Risk File Sharing Using M365 Native Tools
As with high-risk file detection, several native tools for detecting high-risk file sharing exist in M365, each with how-to steps and best practices.
1. Detect High-Risk Sharing via Microsoft Purview (DLP + Information Protection)
How-to:
- In Microsoft Purview DLP policy creation (as earlier), configure conditions not only for content but also “Content is shared from Microsoft 365 > with people outside of my organization”
- Enable user override but require justification (i.e., require a reason for sharing externally).
- Use alerting / policy tip settings to flag users when they share files externally.
- Monitor DLP incident reports / alerts where the action condition is external sharing.
- Use reporting in Purview to see "external sharing events" over time and which labels or SIT-types are most frequently shared externally.
- Tie in Insider Risk Management / Adaptive Protection to increase risk scores if a user frequently shares externally.
Best Practices & Notes:
- Start in monitor-only / alert-only mode for external sharing rules to observe patterns.
- Employ user education and justification prompts so users think twice before sharing externally.
- Escalate or revoke sharing in high-risk incidents automatically if possible (via automation).
- Periodically review sharing exceptions, especially in functional groups which may legitimately share externally.
2. Detect High-Risk Sharing Using Microsoft SharePoint
SharePoint has direct controls and reporting to help detect unsafe sharing.
How-to:
- In the SharePoint admin center, configure external sharing settings per site (e.g., disable “Anyone with link” or restrict editing for external users).
- Use SharePoint site usage / access reports to see which files or folders have guest user access or external sharing.
- Use the “Manage access” pane on document libraries or files to view who has access, including nested or inherited guest accounts.
- Use PowerShell / Graph API scripts/automation to enumerate:
- Sites with external sharing enabled
- Files with anonymous link sharing
- External users across site collections
- Use “Check Permissions” tool to understand effective permissions.
Best Practices & Notes:
- Enforce sharing link expiration (e.g., 30 or 90 days).
- Use block download or view-only external links where possible.
- Regularly clean up or revoke stale links (e.g., older than a threshold).
- Use tenant-level external sharing policies (in M365 admin) to limit overall sharing risk.
- Educate site owners about permission hygiene, avoid “Everyone except external users” sites unless necessary.
3. Detect High-Risk Sharing Using Microsoft Entra / Identity Tools
Because sharing often involves guest accounts and identity configurations, Entra (Azure AD / Microsoft Entra) has a role.
How-to:
- In the Microsoft Entra Admin Center, review External Identities / Guest users to detect large numbers of guest accounts, stale guests, or guests with elevated privileges.
- Use Entra ID Protection / Risky Users reports to flag guest accounts involved in risky sign-ins or behavior.
- Use conditional access policies to limit guest access (e.g., require MFA for guests, restrict from untrusted networks).
- Monitor OAuth / App registrations that might be granting sharing or file access to external apps. (CoreView’s free Entra Security Scanner is one tool to detect risky app permissions).
- Use Identity Governance / Access Reviews periodically to review guest access and remove stale or unnecessary accounts.
Best Practices & Notes:
- Periodically audit guest accounts not used in the last N days and disable or remove them.
4. Detect High-Risk Sharing in OneDrive (same as SharePoint)
OneDrive (for Business) also includes sharing features that require oversight.
How-to:
- In the OneDrive, enforce sharing settings (disable or limit anonymous links, disable editing for external users, require expiration).
- Use Usage Reports (in M365 admin / SharePoint center) to see which OneDrives have external shares or anonymous links.
- Use PowerShell / Graph API to enumerate shared files in OneDrive with external users or anonymous links.
- Use DLP policies scoped to OneDrive (as in Purview) to flag externally shared files with high-sensitivity content.
- Use OneDrive sync control policies to limit which devices can sync cloud files locally, thereby reducing data leakage paths.
Best Practices & Notes:
- Enforce link expiration and password-protected sharing for external links.
- Restrict external sharing to view-only where possible.
- Use reporting and revocation workflows to clean up stale or risky shares.
- Train users to prefer internal team shares (Teams / SharePoint) over OneDrive external sharing.
How to Get Visibility Into High-Risk File Detection With CoreView
While Microsoft’s native tools are powerful, in enterprise or multi-tenant environments you’ll often need better visibility and correlation across tenants, workloads, and time periods. This is where CoreView can add value.
What CoreView Offers for High-Risk File Detection
CoreView provides a unified management and security layer on top of M365. Its strengths in this area include:
- Cross-tenant and cross-workload visibility into file activity and sharing.
- Custom dashboards and alerts for suspicious file access or changes.
- Role-based access control for who can view or act on detection alerts.
- Remediation workflows (e.g., revoke access, remove sharing links)
- Integration with CoreView’s tenant management and cyber resilience tooling (e.g., configuration drift detection, backup and restore, permission reviews).
In CoreView’s cyber resilience framework, detecting high-risk files and sharing is one of the key pillars of maturity. As a central reporting, workflow and visibility hub, CoreView fills the visibility gaps in Microsoft 365.
By using CoreView, you get a proactive and centralized way to detect M365 high-risk files and high-risk file shared drive anomalies and make them visible, facilitating the enforcement of M365 high-risk file security across your environment.
How to Build Cyber Resilience into M365, Step-by-Step
Detection and remediation are essential, but to truly respond to attacks or misconfigurations you want cyber resilience, that is, the ability to anticipate, absorb, recover, and adapt.
Step 1: Assess and Baseline
- Inventory all M365 workloads, tenants, sites, and external sharing posture.
- Identify your critical file locations / repositories.
- Enable auditing.
- Establish baseline behavior (file access volumes, sharing rates, external access patterns).
Step 2: Build Visibility and Alerting
- Deploy Purview DLP policies (in monitoring mode) to flag high-risk files/shares.
- Enable Defender protections (Safe Attachments, Threat Explorer).
- Connect Defender for Cloud Apps, ingest activity logs.
- Configure SharePoint DAG and permission reports.
- Integrate all telemetry into a central SOC or SIEM (e.g., Microsoft Sentinel).
Step 3: Layer Protection and Enforcement
- Gradually escalate DLP policies from monitor to restrict to block.
- Enforce sensitivity labels and encryption for sensitive content.
- Harden sharing settings (disable anonymous access, set expiration, require guest oversight).
- Restrict which users or groups can share externally.
- Use conditional access / MFA / least privilege for guest and internal accounts.
Step 4: Add Governance, Automation and Remediation
- Use CoreView (or equivalent) to centralize detection, automation, and workflows.
- Define remediation playbooks (revoke links, reduce permissions, alert owners).
- Employ access reviews, guest expiration, and periodic cleanups.
- Monitor configuration drift and perform rollback (CoreView supports configuration backups, which Microsoft does not).
- Ensure role-based access for detection and response roles.
Step 5: Prepare for Attack and Recovery
- Define data exfiltration / detection response playbooks (escalation paths).
- Build incident response plans specifically for file breaches.
- Maintain backups of configuration and (where legal) critical content.
- Conduct red-team / adversary simulation (e.g. simulate malicious file creation and sharing) to validate policies.
- Use Sentinel or XDR to correlate file alerts with identity or threat events.
Step 6: Monitor, Adapt and Iterate
- Review false positives and negatives; tune rules.
- Expand coverage to new file types, new workloads, new data sources.
- Stay current on threat trends, exploit techniques, zero-days.
- Feed learnings back into policy, detection thresholds, and automation.
Use Detection as Early Line of Defense with CoreView
Detecting high-risk files and high-risk file sharing in M365 is not a one-time checklist. It is a journey of consistent behaviors, and layering tools, building governance, tuning rules, and fostering a security-conscious culture. Using native tools, such as Purview, Defender, SharePoint governance, and Entra identity, you can establish robust detection and enforcement. But in large or complex environments, CoreView can scale your detection and response workflows through centralized reporting and visibility capabilities.
By aligning detection with governance, remediation, and resilience planning, you move from reactive patching to proactive control, lowering your risk footprint and building confidence that your most sensitive files are protected, no matter how collaboration patterns evolve.