SharePoint’s built-in permission levels work for most teams, but they can be too broad or too limited for specific business requirements. Custom permission levels let admins define exactly what users can do, such as edit content without deleting it or approve documents without managing site settings. This guide explains when custom roles make sense, when they create unnecessary complexity, and how to create them using three main approaches: the SharePoint interface, PnP PowerShell, or developer-led methods such as CSOM and the SharePoint REST API.
Custom permission levels help when SharePoint’s built-in roles cannot support a repeatable access requirement without granting excessive privileges. They should not compensate for poor site architecture, temporary exceptions, or unclear ownership. Define the business need first, copy the closest built-in level, change only the permissions that create risk, and assign the result through an appropriate group. Use the web interface for isolated changes, PnP PowerShell for repeatable deployment, and CSOM or REST for applications and provisioning. Long-term success depends on documentation, realistic testing, regular access reviews, and visibility into assignments, broken inheritance, and sharing links. CoreView can help teams identify and remediate those risks.
A SharePoint custom permission level is a reusable collection of permissions that defines what users are allowed to do. It is useful when the built-in permission levels grant either too much or too little access for a clearly defined, repeatable business requirement.
Before getting into the configuration options, it helps to be clear about what a custom permission level does, and what it does not do.
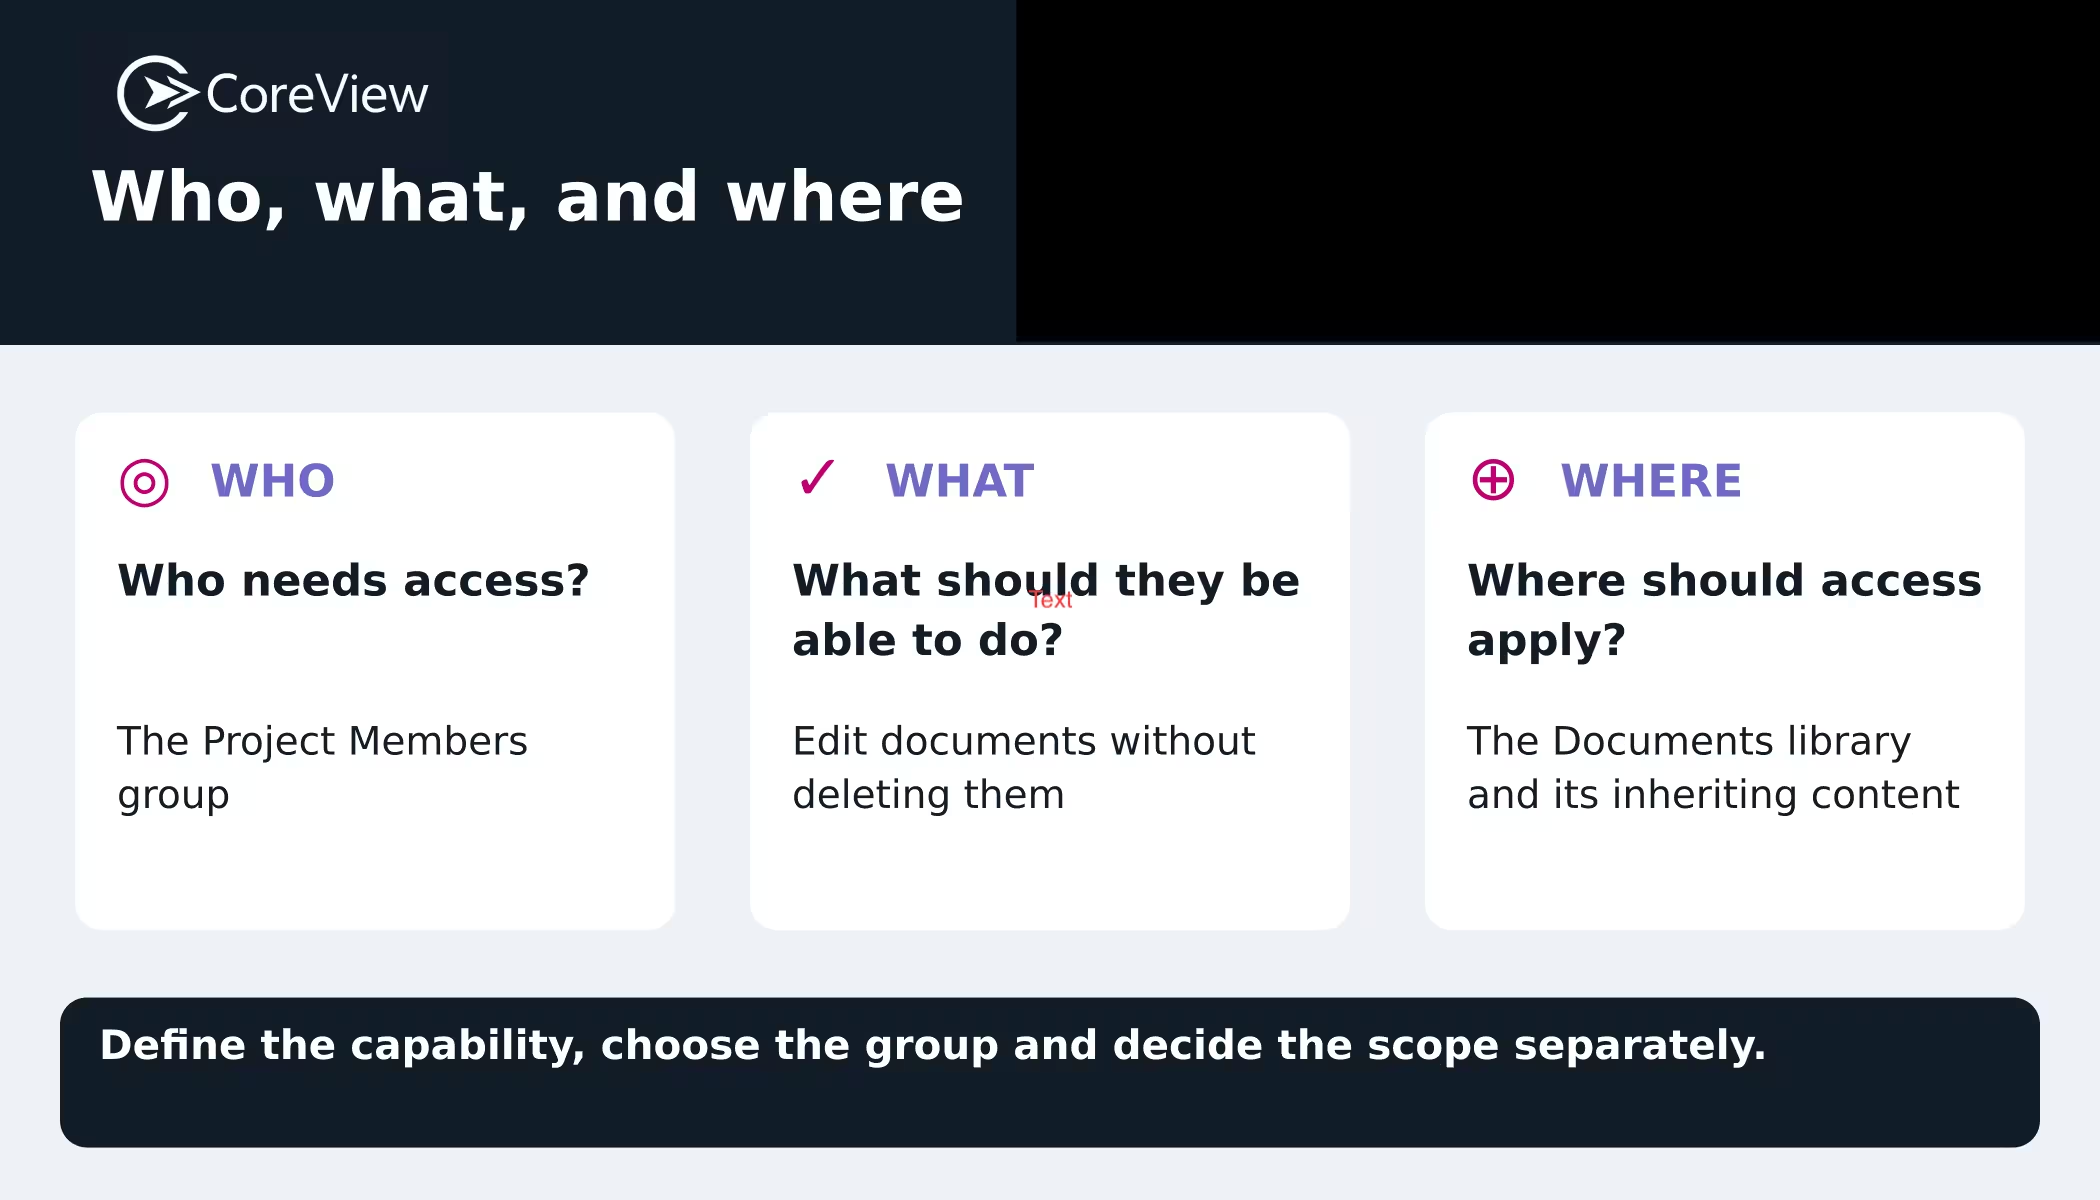
The easiest way to understand custom permission levels is to separate three questions: What can someone do? Who receives that access? And where does it apply? In SharePoint, permission levels, groups, and inheritance answer those questions separately.
A SharePoint custom permission level is a user-defined collection of individual permissions that controls what an assigned user or group can do.
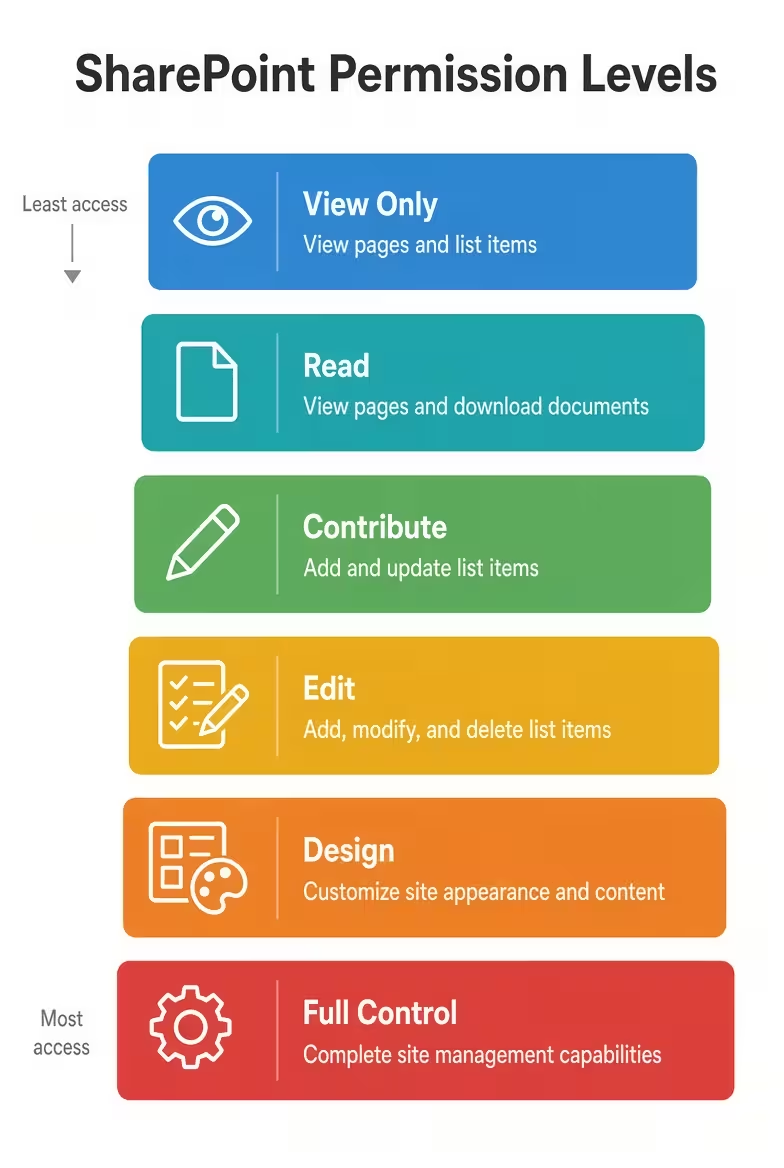
SharePoint’s standard permission levels include Read, Contribute, Edit, Design, and Full Control. A custom permission level is appropriate when those standard combinations do not meet a specific business requirement. For example, an organization might need contributors to upload and edit controlled documents while preventing them from deleting those documents or their version histories.
A custom permission level does not grant access by itself. After creating it, an administrator must assign it to a user or, preferably, a SharePoint group at the appropriate scope. Creating the level also does not break permission inheritance. Creation, assignment, and inheritance are separate decisions.
This distinction is one of the most frequently misunderstood aspects of SharePoint security.
Over the years, I've reviewed environments where administrators created dozens of custom permission levels when the real requirement involved inheritance. I've also seen the opposite: inheritance broken repeatedly when the organization actually needed a different permission definition.
Understanding the difference between "what users can do" and "where they can do it" is fundamental to building a manageable access model.
A custom permission level defines what actions users can perform. Unique permissions determine where a permission assignment applies when an object no longer inherits its assignments from its parent.
If users need to edit documents but must not delete them, the requirement concerns user capabilities and may justify a custom permission level. If a confidential library must be accessible only to a legal team, the requirement concerns the location or scope of the assignment and may require a separate library or intentionally broken inheritance.
In my experience, organizations often arrive at custom permission levels only after discovering that one of SharePoint's built-in roles grants either too much or too little access.
That's not necessarily a problem. The key question is whether the requirement represents a legitimate and repeatable business need or simply a one-off exception.
Create a custom permission level when SharePoint’s built-in levels do not support a clearly defined, long-term business requirement without granting unnecessary capabilities. A custom permission level is usually worth considering when:
When a request for a new permission level comes in, I try to slow things down and ask a few governance questions first.
Creating the role takes a few minutes. Supporting it for the next three years is the real commitment. Before I recommend a custom permission level, I work through the following questions to make sure we are solving the right problem rather than adding another exception that someone will need to untangle later.
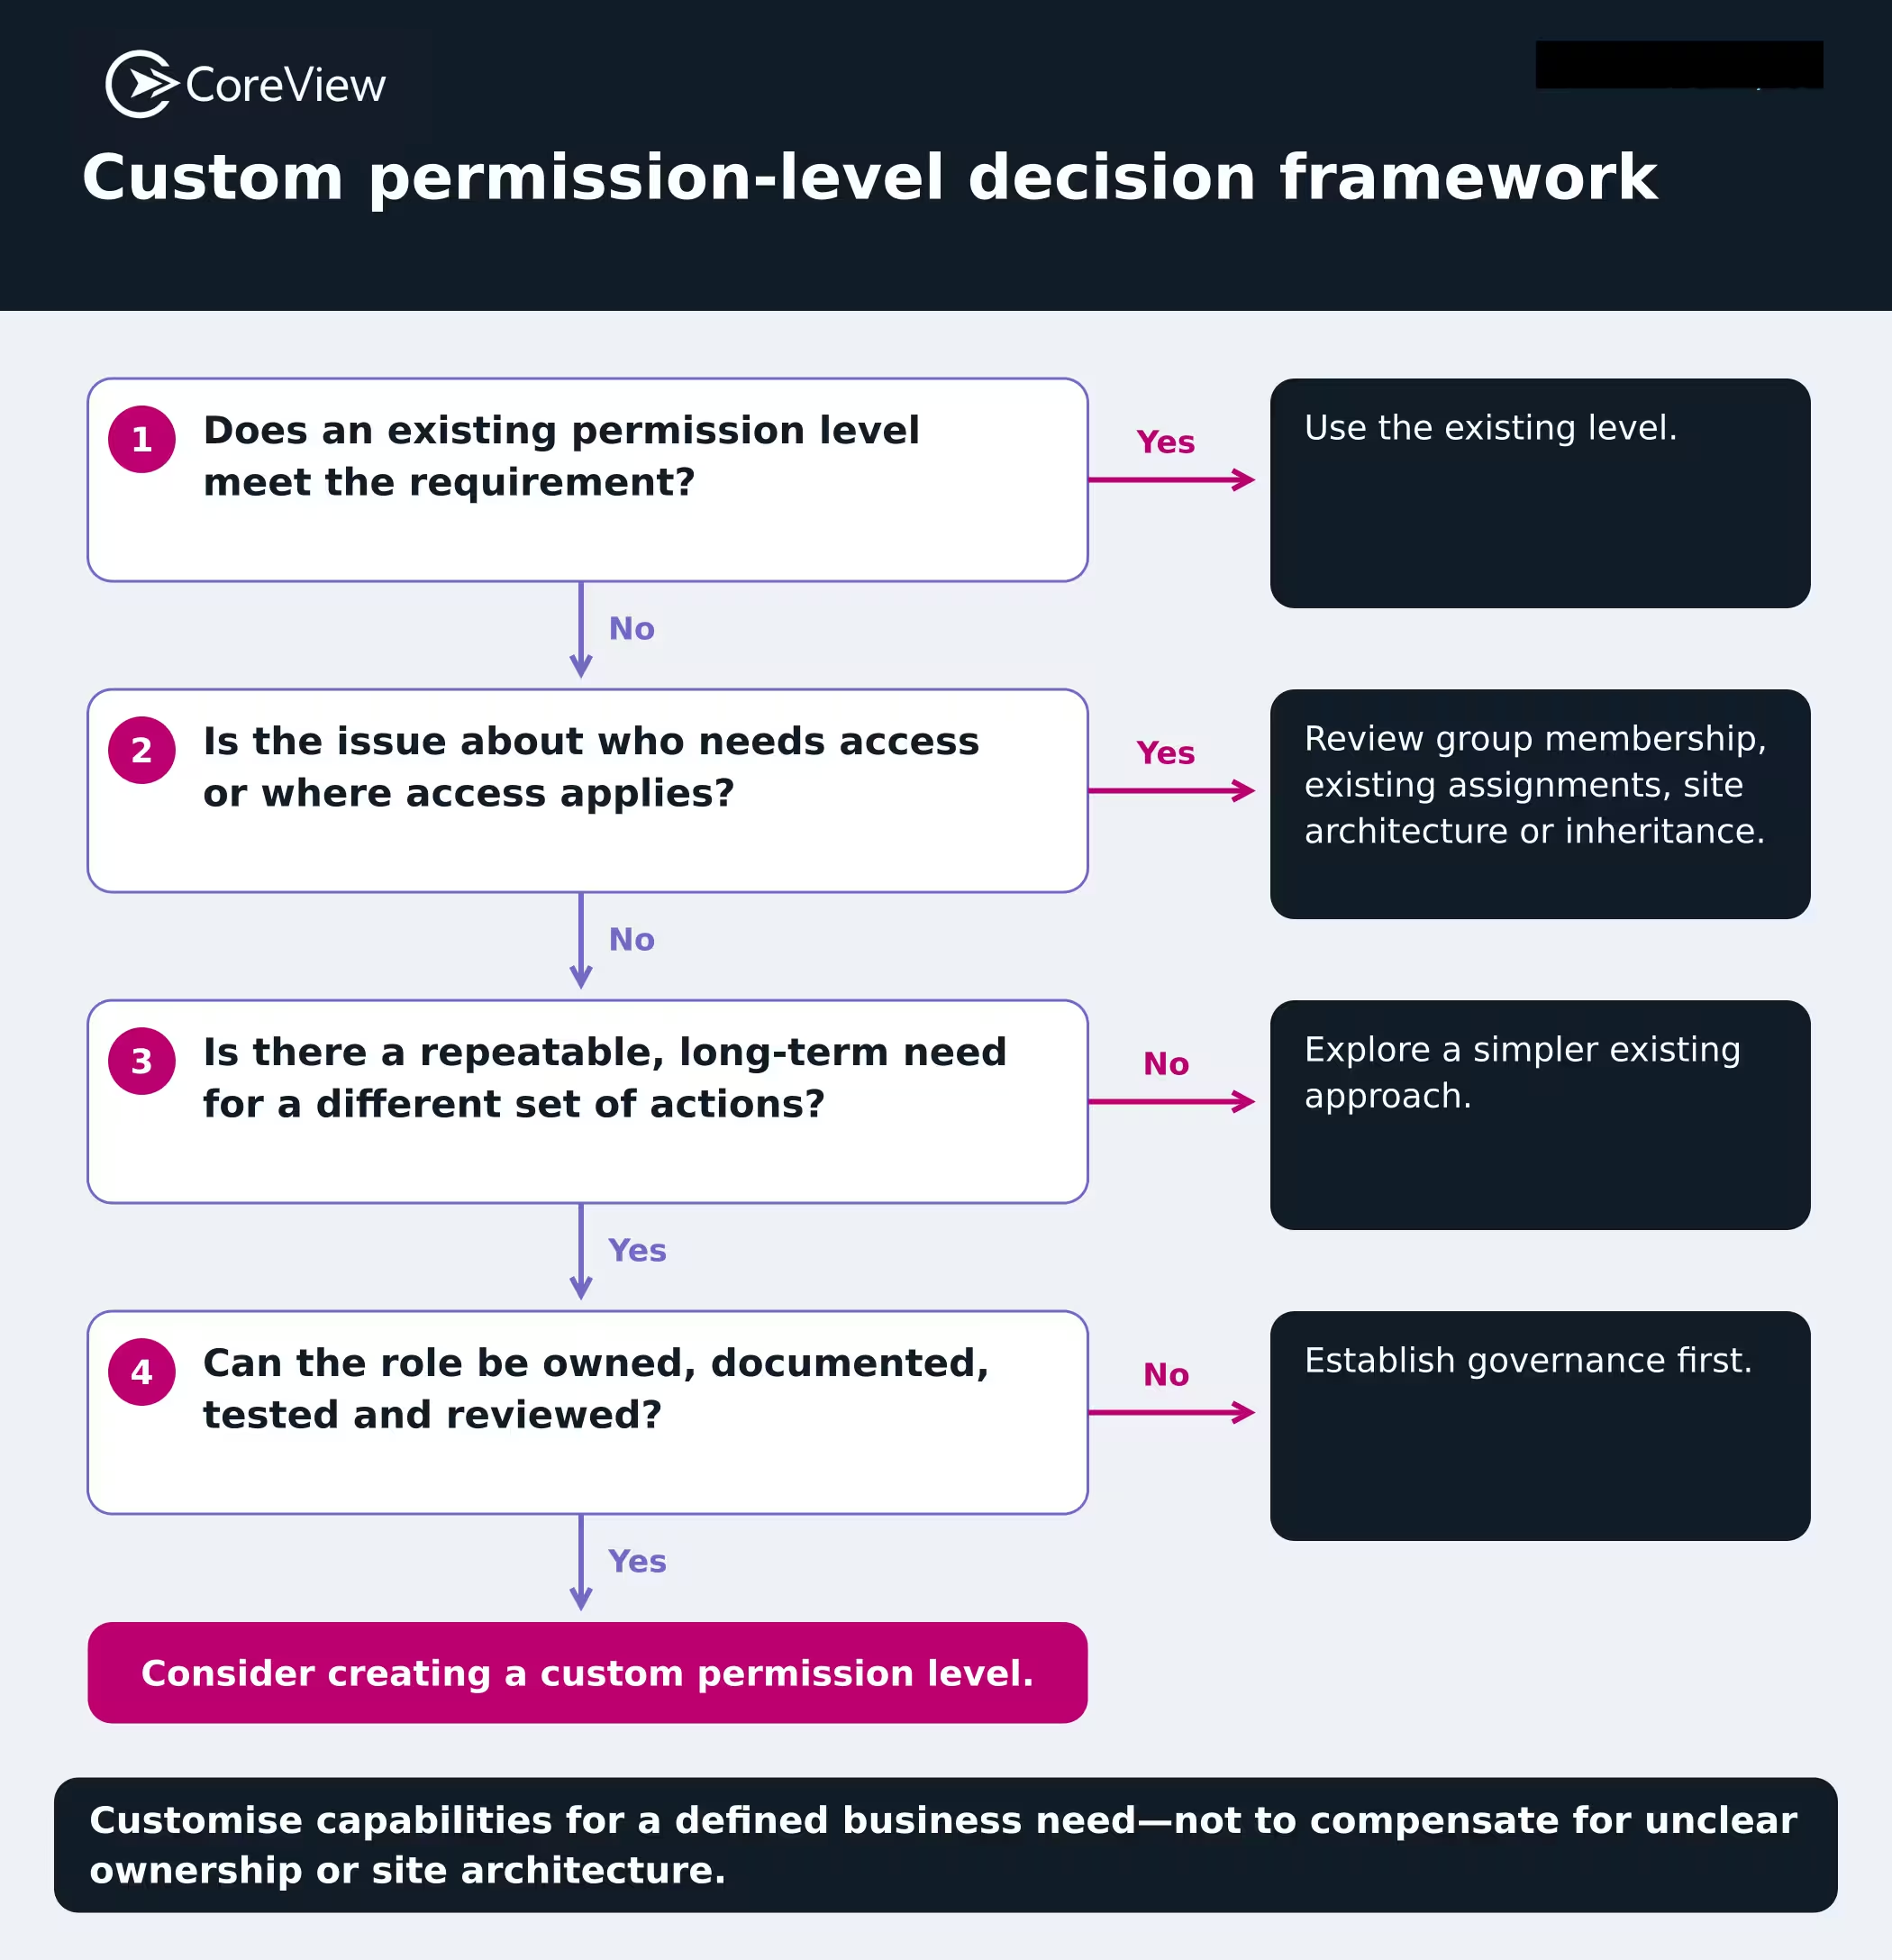
Some of the best permission decisions involve not creating a new permission level at all.
As a consultant and administrator, I've seen environments accumulate dozens of custom roles over time. Most were created with good intentions. Unfortunately, many existed because administrators attempted to solve governance, architecture, or ownership problems with increasingly granular permissions.
Before introducing another custom definition, consider whether one of the following situations applies.
Do not create a custom permission level when the underlying requirement can be addressed more simply through groups, existing permission levels, inheritance, sharing controls, or improved site architecture.
If Marketing, Human Resources, contractors, or a regional team need access, use an approved group-based access method and assign an existing permission level.
Use an existing group and establish a process for reviewing and removing membership when the engagement ends.
If the requirement is to isolate sensitive content, first evaluate the site and information architecture. A separate site or library may produce a cleaner boundary.
Custom permission levels should not compensate for mixed sensitive and general content, inconsistent ownership, unclear architecture, or excessive folder-level exceptions.
Permission levels should describe reusable capabilities or business functions, not reporting structures or job titles.
Establish ownership, document roles, review memberships and direct assignments, standardize patterns, and retire obsolete configurations before adding more roles.
For many administrators, the SharePoint interface remains the best starting point for creating custom permission levels.
Even when automation is the end goal, I like to build and test the permission level manually first. Seeing the individual permissions in the interface makes it much easier to spot an assumption or missing dependency before that configuration is repeated through PowerShell or code.
The SharePoint web interface is the most approachable method. It is best suited to one-time changes, testing, training, and configuration within a small number of site collections.
Example scenario: A business team needs to collaborate on documents, but compliance policies require that only records managers can permanently delete content.
Before clicking through the settings interface, define exactly which actions should be allowed and which should be prohibited. Document all permitted and restricted actions, then identify the built-in permission level that most closely matches the requirement.
I suggest capturing the requirement in a short permission-design record before changing the site. At a minimum, specify:
This written baseline prevents the configuration from becoming a collection of unchecked boxes. It also gives administrators a clear standard for validating the custom level before assigning it broadly.
Permission levels are managed from the Permission Levels page reached through Advanced permissions settings, rather than from the simplified sharing panel. This page manages the reusable role definitions available within the site collection, keeping creation of a permission level separate from granting or changing access for users and groups.
From the target site, select Settings, Site permissions, Advanced permissions settings, and then Permission Levels.
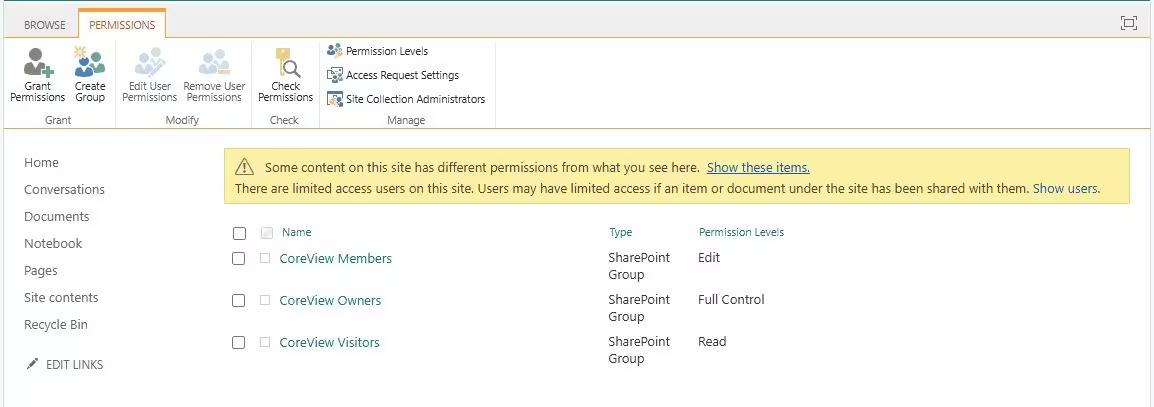
Pause before creating anything new and compare the available definitions with the approved requirement from Step 1. Reusing an existing level avoids unnecessary duplication and reduces the number of custom roles administrators must support over time.
Look for a built-in level or existing custom level that already meets the requirement and identify redundant definitions.
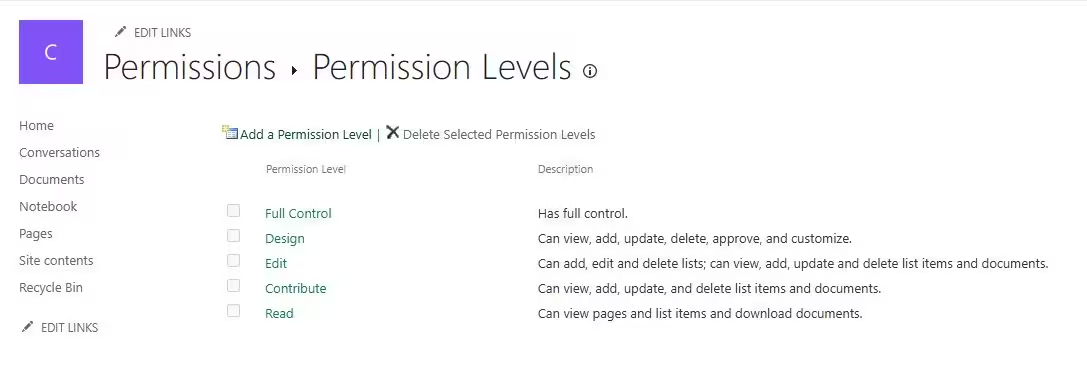
Starting from the closest existing level preserves the supporting permissions that make common SharePoint tasks work. The goal is to make the smallest approved change rather than rebuild a complex permission set from scratch.
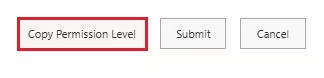
Open the closest level, select Copy Permission Level, provide a new name and description, and change only the approved permissions.
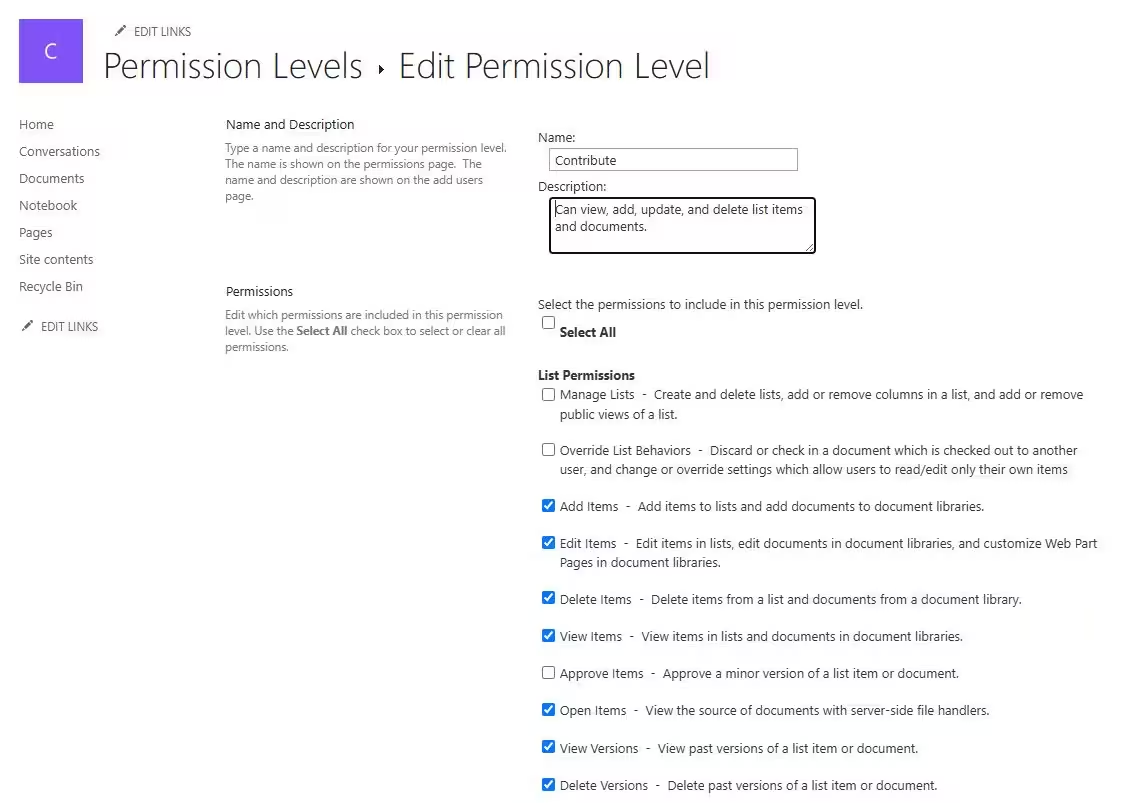
The name should communicate the capability being granted or withheld so another administrator can understand the role without opening its configuration. Avoid department names, project codes, or temporary labels that may lose meaning as the organization changes.
Prefer names such as Contribute Without Delete, Content Approver, Records Coordinator, or Metadata Manager.
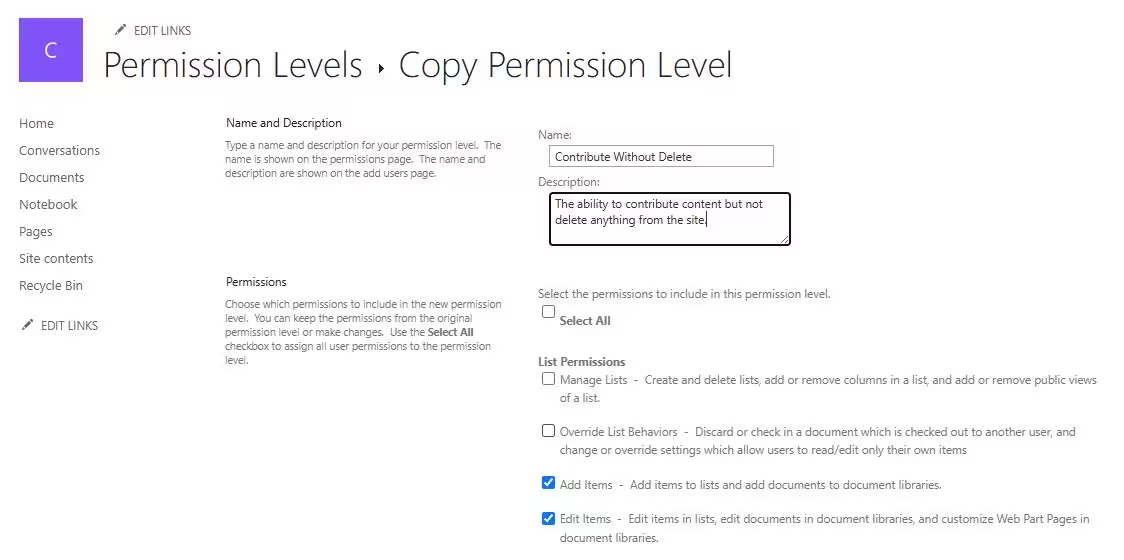
A strong description records why the role exists and the boundary it is designed to enforce. This context becomes essential during access reviews, troubleshooting, and decisions about whether the role should be retained or retired.
Record the business purpose, such as allowing approved contributors to edit content without deleting items or versions.
Translate the approved actions from Step 1 into the smallest practical set of SharePoint permissions. Review each change against the level you copied, because removing a supporting permission can prevent otherwise approved tasks from working.
Retain required list and supporting site permissions, while excluding prohibited actions. Account for permission dependencies.
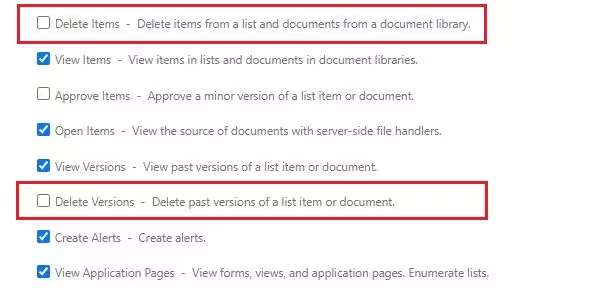
Treat creation as a controlled checkpoint rather than the end of the process. Review the final name, description, and selected permissions against the approved design before saving the reusable definition.
Verify the name, description, and least-privilege design, select Create, and confirm it appears in the list.
The new permission level does not grant access until it is assigned to a principal at the appropriate scope. Using a SharePoint group keeps the permission definition separate from user membership and makes future access reviews and staff changes easier to manage.
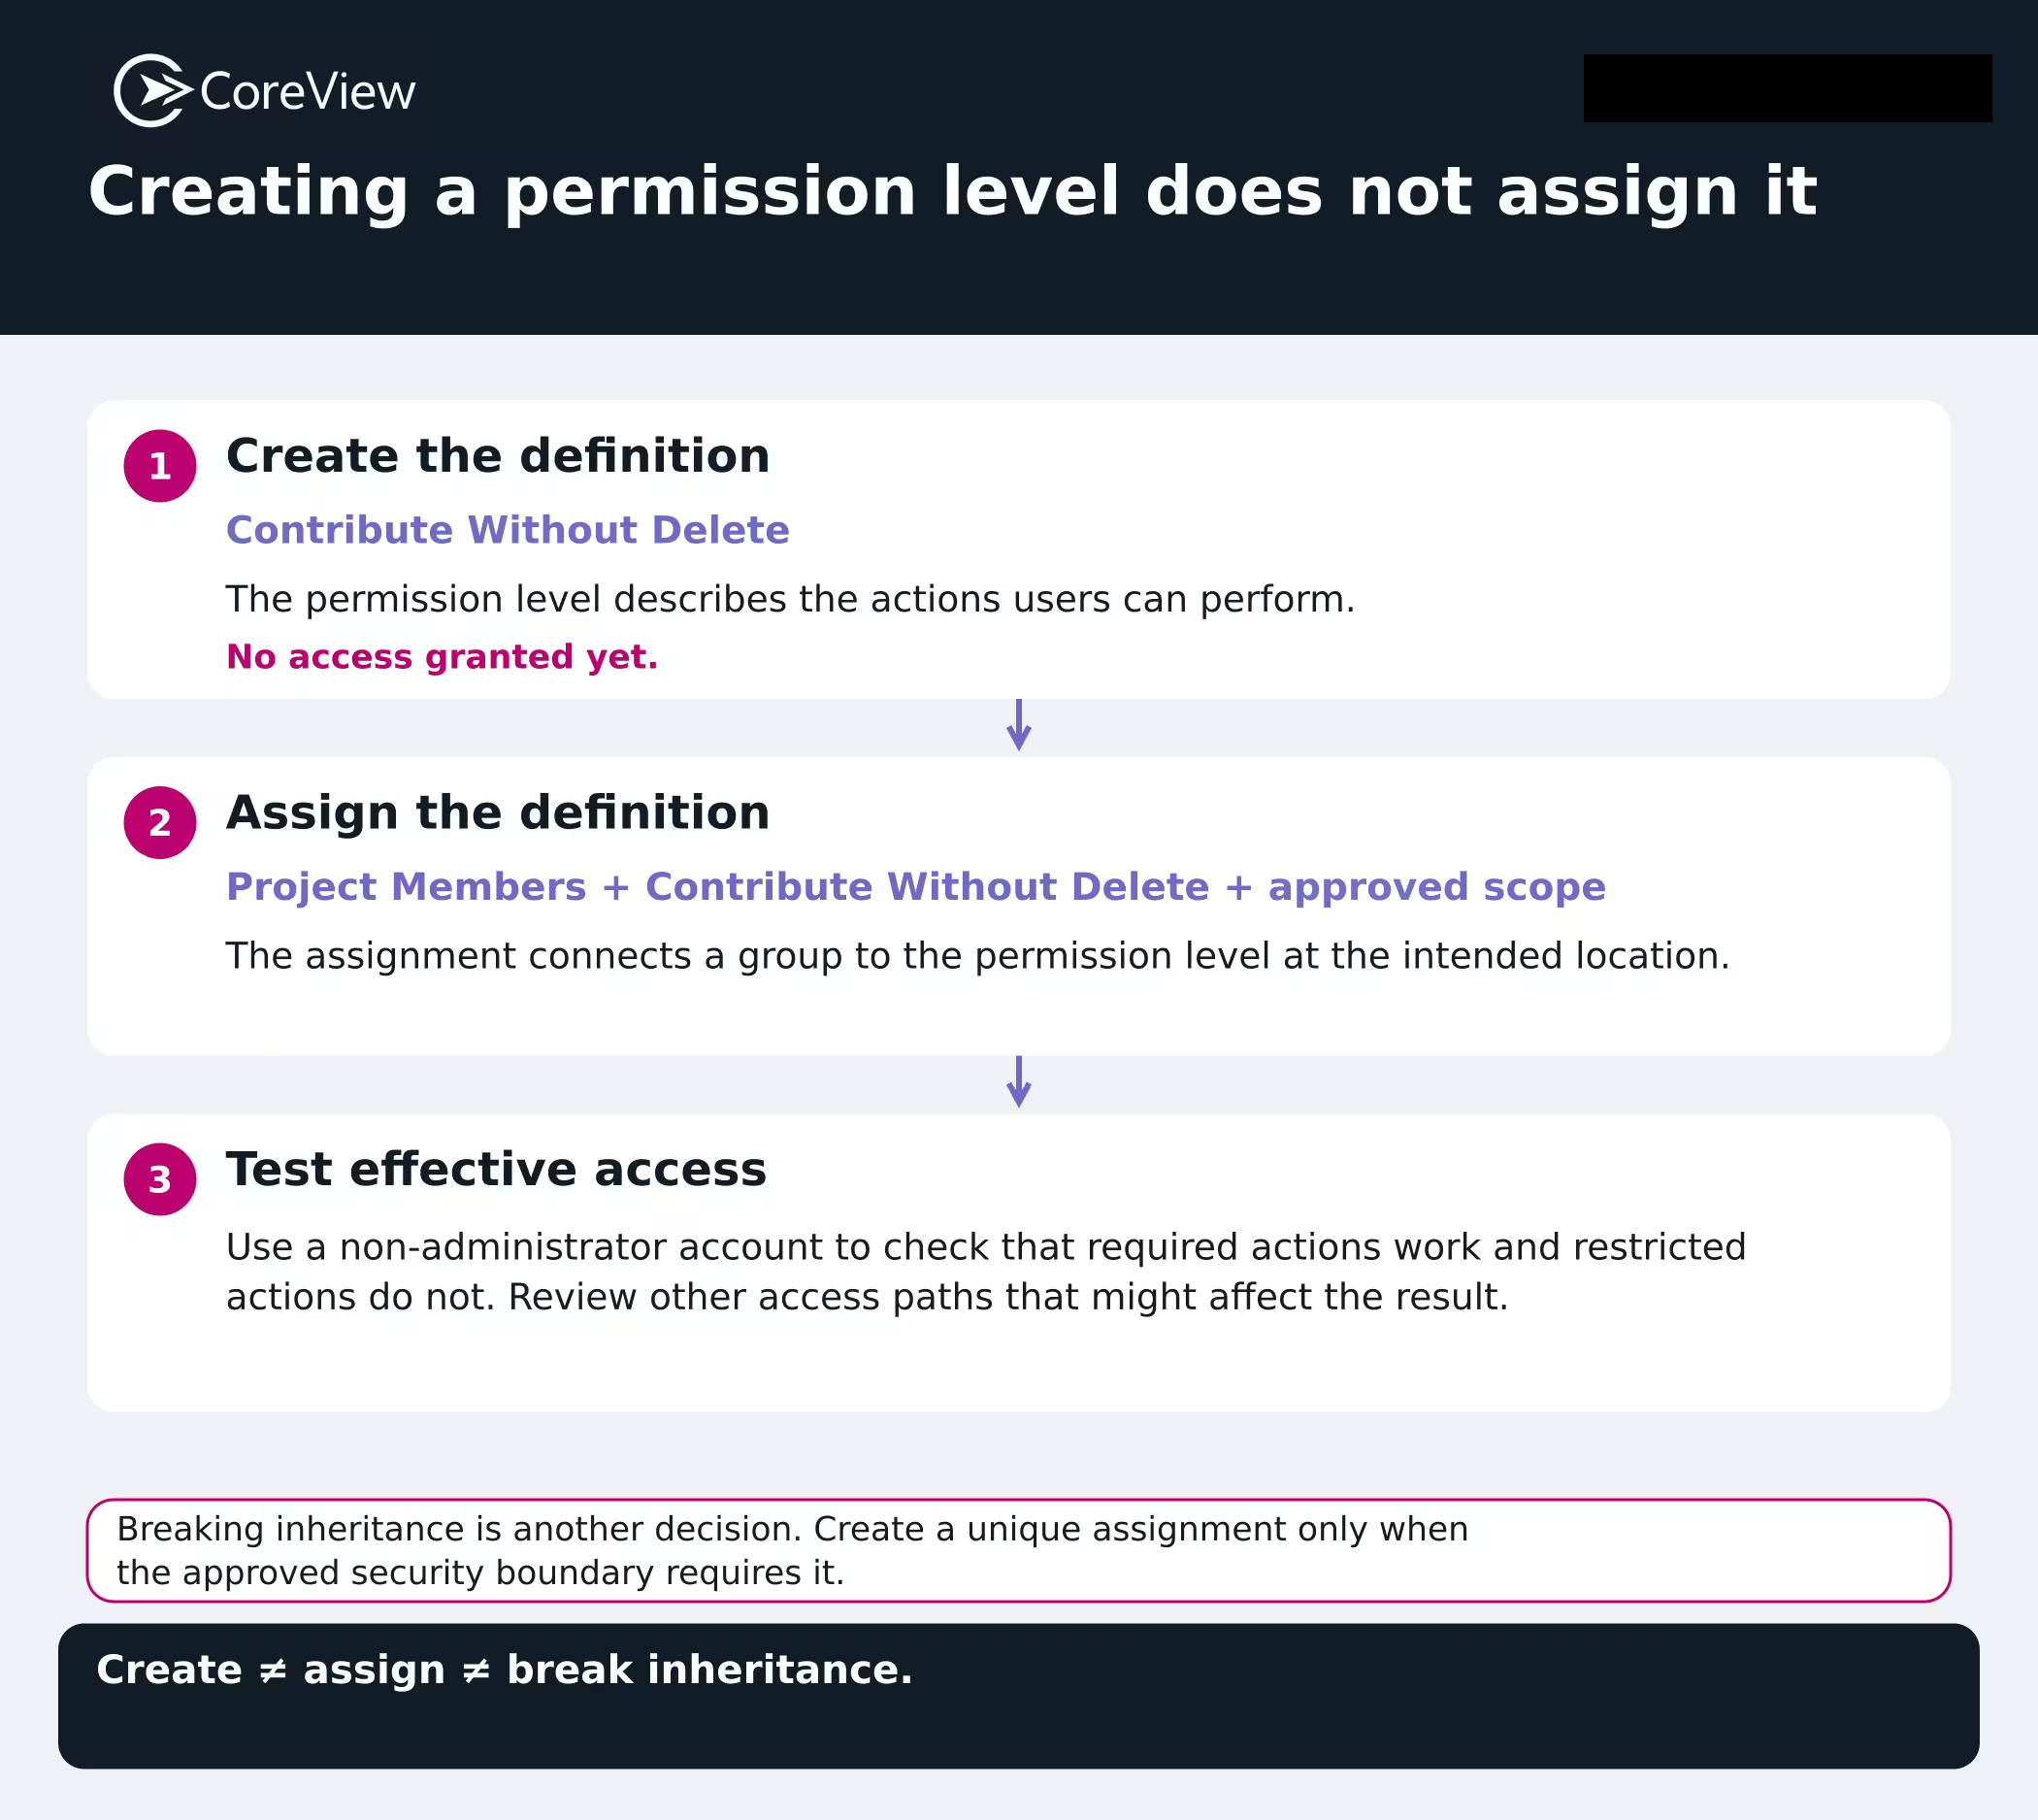
For a group-connected team site, first determine whether membership should continue to be managed through the associated Microsoft 365 group. Assigning a custom permission level through a separate SharePoint group can be appropriate for a distinct role, but it creates an additional access path that administrators must document and review.
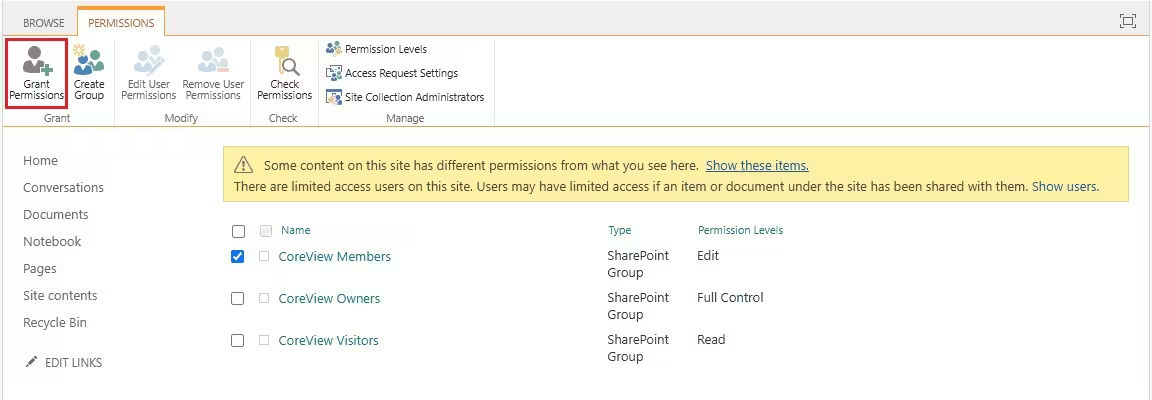
Assign the custom level to a SharePoint group rather than directly to individual users whenever possible.
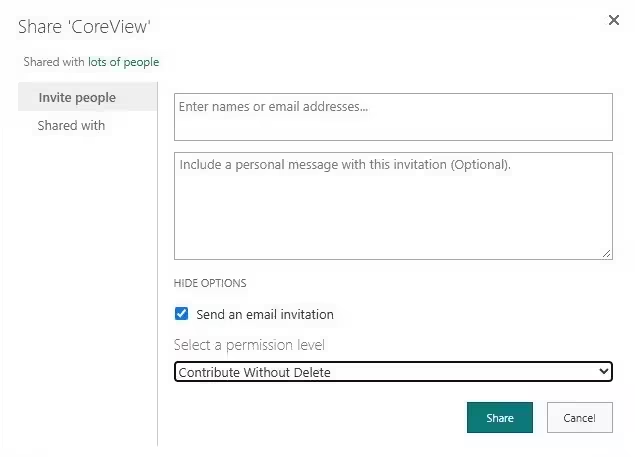
Test the custom permission level with a non-administrator account that receives access only through the intended group. Confirm that required actions succeed, including opening the site, viewing pages, browsing libraries, opening documents, editing content, updating metadata, and completing approvals. Then confirm that prohibited actions fail, including deleting items or versions, changing permissions, managing the site, and accessing content outside the approved scope. Use the same browser and device experience expected in production, document the results, and retain the test account or script for future reviews.
If testing reveals missing dependencies or unintended access, remove the custom role assignment from the test group before changing the permission level. Record the failed scenario, compare the role with the built-in level it was copied from, restore only the supporting permissions required for the approved task, and repeat the full positive and negative test cycle before approving the role for production use.
Manual setup works well until the same permission level needs to appear in a second, fifth, or fiftieth site collection.
That is usually the point where I move the configuration into PowerShell so the definition can be repeated, reviewed, and kept under change control.
PnP PowerShell is the practical choice for that administrator-led work, especially when consistency matters across multiple site collections.
Before running the examples, make sure the administrative environment and authentication approach are ready for testing.
Start by confirming that the PnP PowerShell module is available and that you can connect successfully to the target site. This basic validation separates authentication or environment problems from errors in the permission-level commands that follow.
Interactive authentication also requires a Microsoft Entra ID application registration and its client ID. Register or use an approved tenant application with the minimum permissions needed, then supply that client ID through the connection command or the supported PnP PowerShell environment-variable configuration.
Install-Module PnP.PowerShell -Scope CurrentUser
Get-Module PnP.PowerShell -ListAvailable

Connect-PnPOnline `
    -Url "https://contoso.sharepoint.com/sites/ProjectSite" `
    -Interactive

Get-PnPWebBefore creating another role, inspect the permission definitions already available in the site. This check helps prevent duplicate or overlapping roles and gives you a baseline for naming and documenting the new definition consistently.
Get-PnPRoleDefinition |
Select-Object Name, DescriptionCloning the closest built-in permission level is generally safer than assembling a role from an empty permission set. It preserves the supporting permissions users need while allowing you to remove the specific capabilities that conflict with the approved business requirement.
Add-PnPRoleDefinition `
    -RoleName "Contribute Without Delete" `
    -Description "Allows users to add and edit content without deleting items or versions." `
    -Clone "Contribute" `
-Exclude DeleteListItems, DeleteVersionsCreating the role is only the first part of the process. Verify that the definition exists as expected, and then assign it to the intended SharePoint group so membership and permissions remain separate and easier to govern.
Get-PnPRoleDefinition -Identity "Contribute Without Delete"

Set-PnPGroupPermissions `
    -Identity "Project Members" `
-AddRole "Contribute Without Delete"A repeatable deployment should be safe to run more than once without creating duplicate permission levels or producing an avoidable failure. An idempotent pattern checks the current state first and creates the role only when it does not already exist.
$roleName = "Contribute Without Delete"
$existingRole = Get-PnPRoleDefinition | Where-Object { $_.Name -eq $roleName }

if ($null -eq $existingRole) {
    Add-PnPRoleDefinition `
        -RoleName $roleName `
        -Description "Allows users to add and edit content without deleting items or versions." `
        -Clone "Contribute" `
        -Exclude DeleteListItems, DeleteVersions
}
else {
    Write-Host "Permission level already exists: $roleName"
}PowerShell is usually enough for administrator-led automation. Once permissions become part of an application, provisioning engine, or integration, however, the conversation shifts to CSOM or REST.
At that point, the design is less about an administrator repeating a task and more about an application applying the same security model reliably.
The SharePoint REST API and Client-Side Object Model, commonly called CSOM, are developer-focused approaches for creating and assigning custom role definitions. They fit applications, provisioning systems, deployment pipelines, SPFx solutions, Azure-hosted integrations, and broader workflows.
With developer-focused approaches, it helps to treat the permission definition and its eventual assignment as two separate operations.
CSOM represents permissions through named PermissionKind values, which makes the intended capabilities easier to review than an unexplained numeric mask. The example first assembles the approved BasePermissions collection and then uses it to create the reusable role definition.
dotnet add package Microsoft.SharePointOnline.CSOMThis example illustrates how to assemble a permission set with named values; it is not a complete programmatic clone of Contribute. Before using it in production, compare the resulting BasePermissions collection with the source permission level and add every supporting permission required by the approved user experience.
using Microsoft.SharePoint.Client;

BasePermissions permissions = new BasePermissions();
permissions.Set(PermissionKind.ViewListItems);
permissions.Set(PermissionKind.AddListItems);
permissions.Set(PermissionKind.EditListItems);
permissions.Set(PermissionKind.OpenItems);
permissions.Set(PermissionKind.ViewVersions);
permissions.Set(PermissionKind.ViewPages);
permissions.Set(PermissionKind.Open);
permissions.Set(PermissionKind.BrowseUserInfo);
permissions.Set(PermissionKind.UseRemoteAPIs);

// DeleteListItems and DeleteVersions are intentionally omitted.

RoleDefinitionCreationInformation roleInfo =
    new RoleDefinitionCreationInformation
{
    Name = "Contribute Without Delete",
    Description = "Allows users to add and edit content without deleting items or versions.",
    BasePermissions = permissions,
    Order = 500
};

RoleDefinition newRole = context.Web.RoleDefinitions.Add(roleInfo);
context.Load(newRole);
context.ExecuteQuery();After creating the role definition, retrieve both the target SharePoint group and the custom role by name. The binding collection connects those two objects, while the role assignment applies that relationship at the selected site scope.
Group targetGroup = context.Web.SiteGroups.GetByName("Project Members");
RoleDefinition customRole = context.Web.RoleDefinitions.GetByName("Contribute Without Delete");
RoleDefinitionBindingCollection bindings = new RoleDefinitionBindingCollection(context);
bindings.Add(customRole);
context.Web.RoleAssignments.Add(targetGroup, bindings);
context.ExecuteQuery();With REST, retrieve the available role definitions first so the application can resolve and validate the correct role definition ID. The assignment request shown here combines that ID with the target group ID and creates the role assignment on the site represented by the web endpoint. Assigning the role to a list, library, folder, or item requires calling the role-assignment endpoint for that securable object and managing inheritance separately.
GET https://contoso.sharepoint.com/sites/ProjectSite/_api/web/roledefinitions?$select=Id,Name,Description,RoleTypeKind
Accept: application/json;odata=nometadata
Authorization: Bearer {access-token}

POST https://contoso.sharepoint.com/sites/ProjectSite/_api/web/roleassignments/addroleassignment(principalid={group-id},roledefid={role-definition-id})
Accept: application/json;odata=nometadata
Authorization: Bearer {access-token}
A REST request that creates a role definition must include a validated base-permission mask. Do not copy an unexplained numeric mask into production.
Unlike the assignment request shown above, creating a role definition through REST requires a BasePermissions payload that represents the approved permission set. Because that payload is expressed as permission masks rather than a readable list of named permissions, generate and validate it from a known configuration, document how it was produced, and test it in a non-production site before using it in an automated deployment.
No single creation method is objectively better than the others.
The best choice depends on who is performing the work, how often it needs to happen, and whether the permission level becomes part of a broader provisioning or governance process.
When clients ask which method to use, the deciding factor is rarely a SharePoint limitation. It is usually whether the organization needs a one-time configuration, a repeatable administrative process, or a permission model embedded in an application or provisioning workflow.
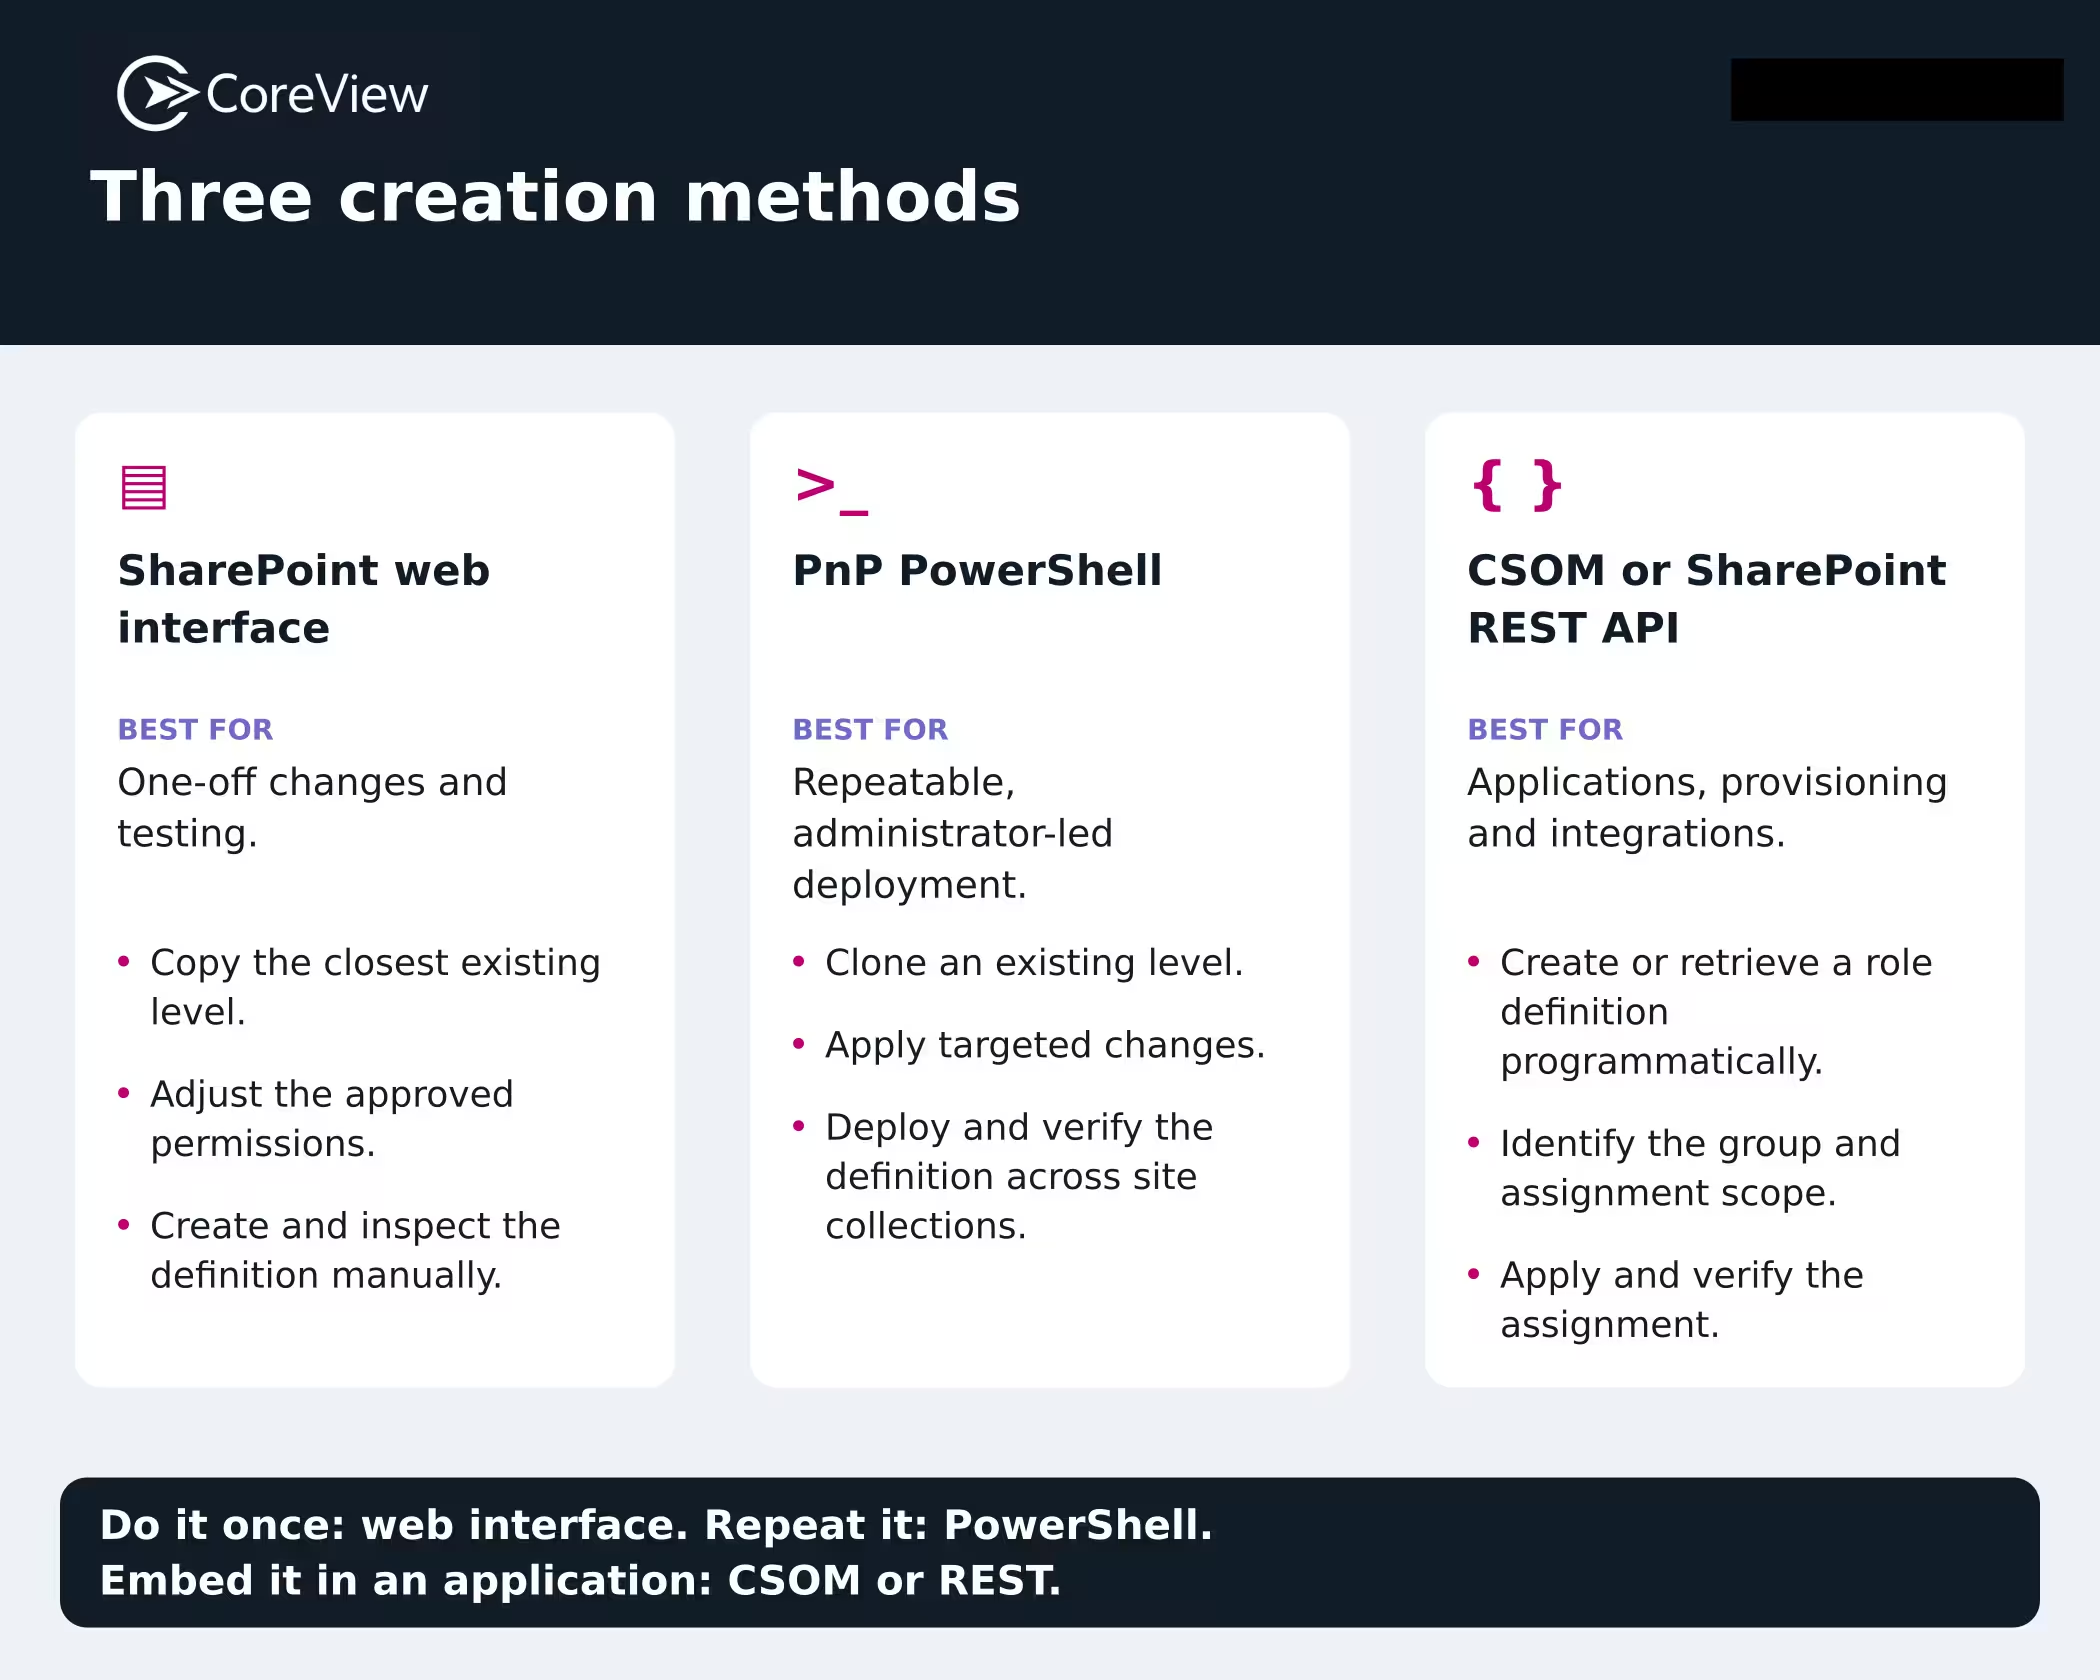
A custom permission level is straightforward to create. The harder part is making sure someone can still explain, test, and govern it a year from now.
These are the habits I see in SharePoint environments where custom roles remain understandable and manageable over time.
Include only the permissions required for the approved business function, and revisit that decision when the function or assigned group changes.
Copy or clone the closest built-in level, then make only the targeted changes required. This retains supporting permissions, reduces unexpected behavior, and gives you a familiar baseline for testing.
For communication sites and other sites managed through SharePoint groups, assign custom levels to a group rather than directly to individuals. For group-connected team sites, keep standard owners and members in the associated Microsoft 365 group, and create a separate SharePoint group only for a documented role the standard membership model cannot support.
Name the role for the capability it grants or restricts, not for a department, person, or temporary project. A future administrator should understand its purpose without opening the permission definition.
Record the business purpose, owner, approval, permissions changed, intended groups and sites, test results, review date, and retirement criteria. Keep that record with the deployment script or governance documentation so another administrator can find it.
Use one approved permission definition, description, test plan, and deployment process across site collections. Treat local variations as documented exceptions rather than creating nearly identical roles.
Use a non-administrator account that receives access only through the intended group. Confirm that required actions succeed, restricted actions fail, and the result matches the browser and device experience users will have in production.
Confirm that the role is still necessary, assigned to the right groups, and applied at the intended scope. Consolidate or retire it when the original requirement no longer exists.
Decide where the role should apply separately from defining what the role allows. Break inheritance only when the approved security boundary requires a unique assignment, and document that exception for future review.
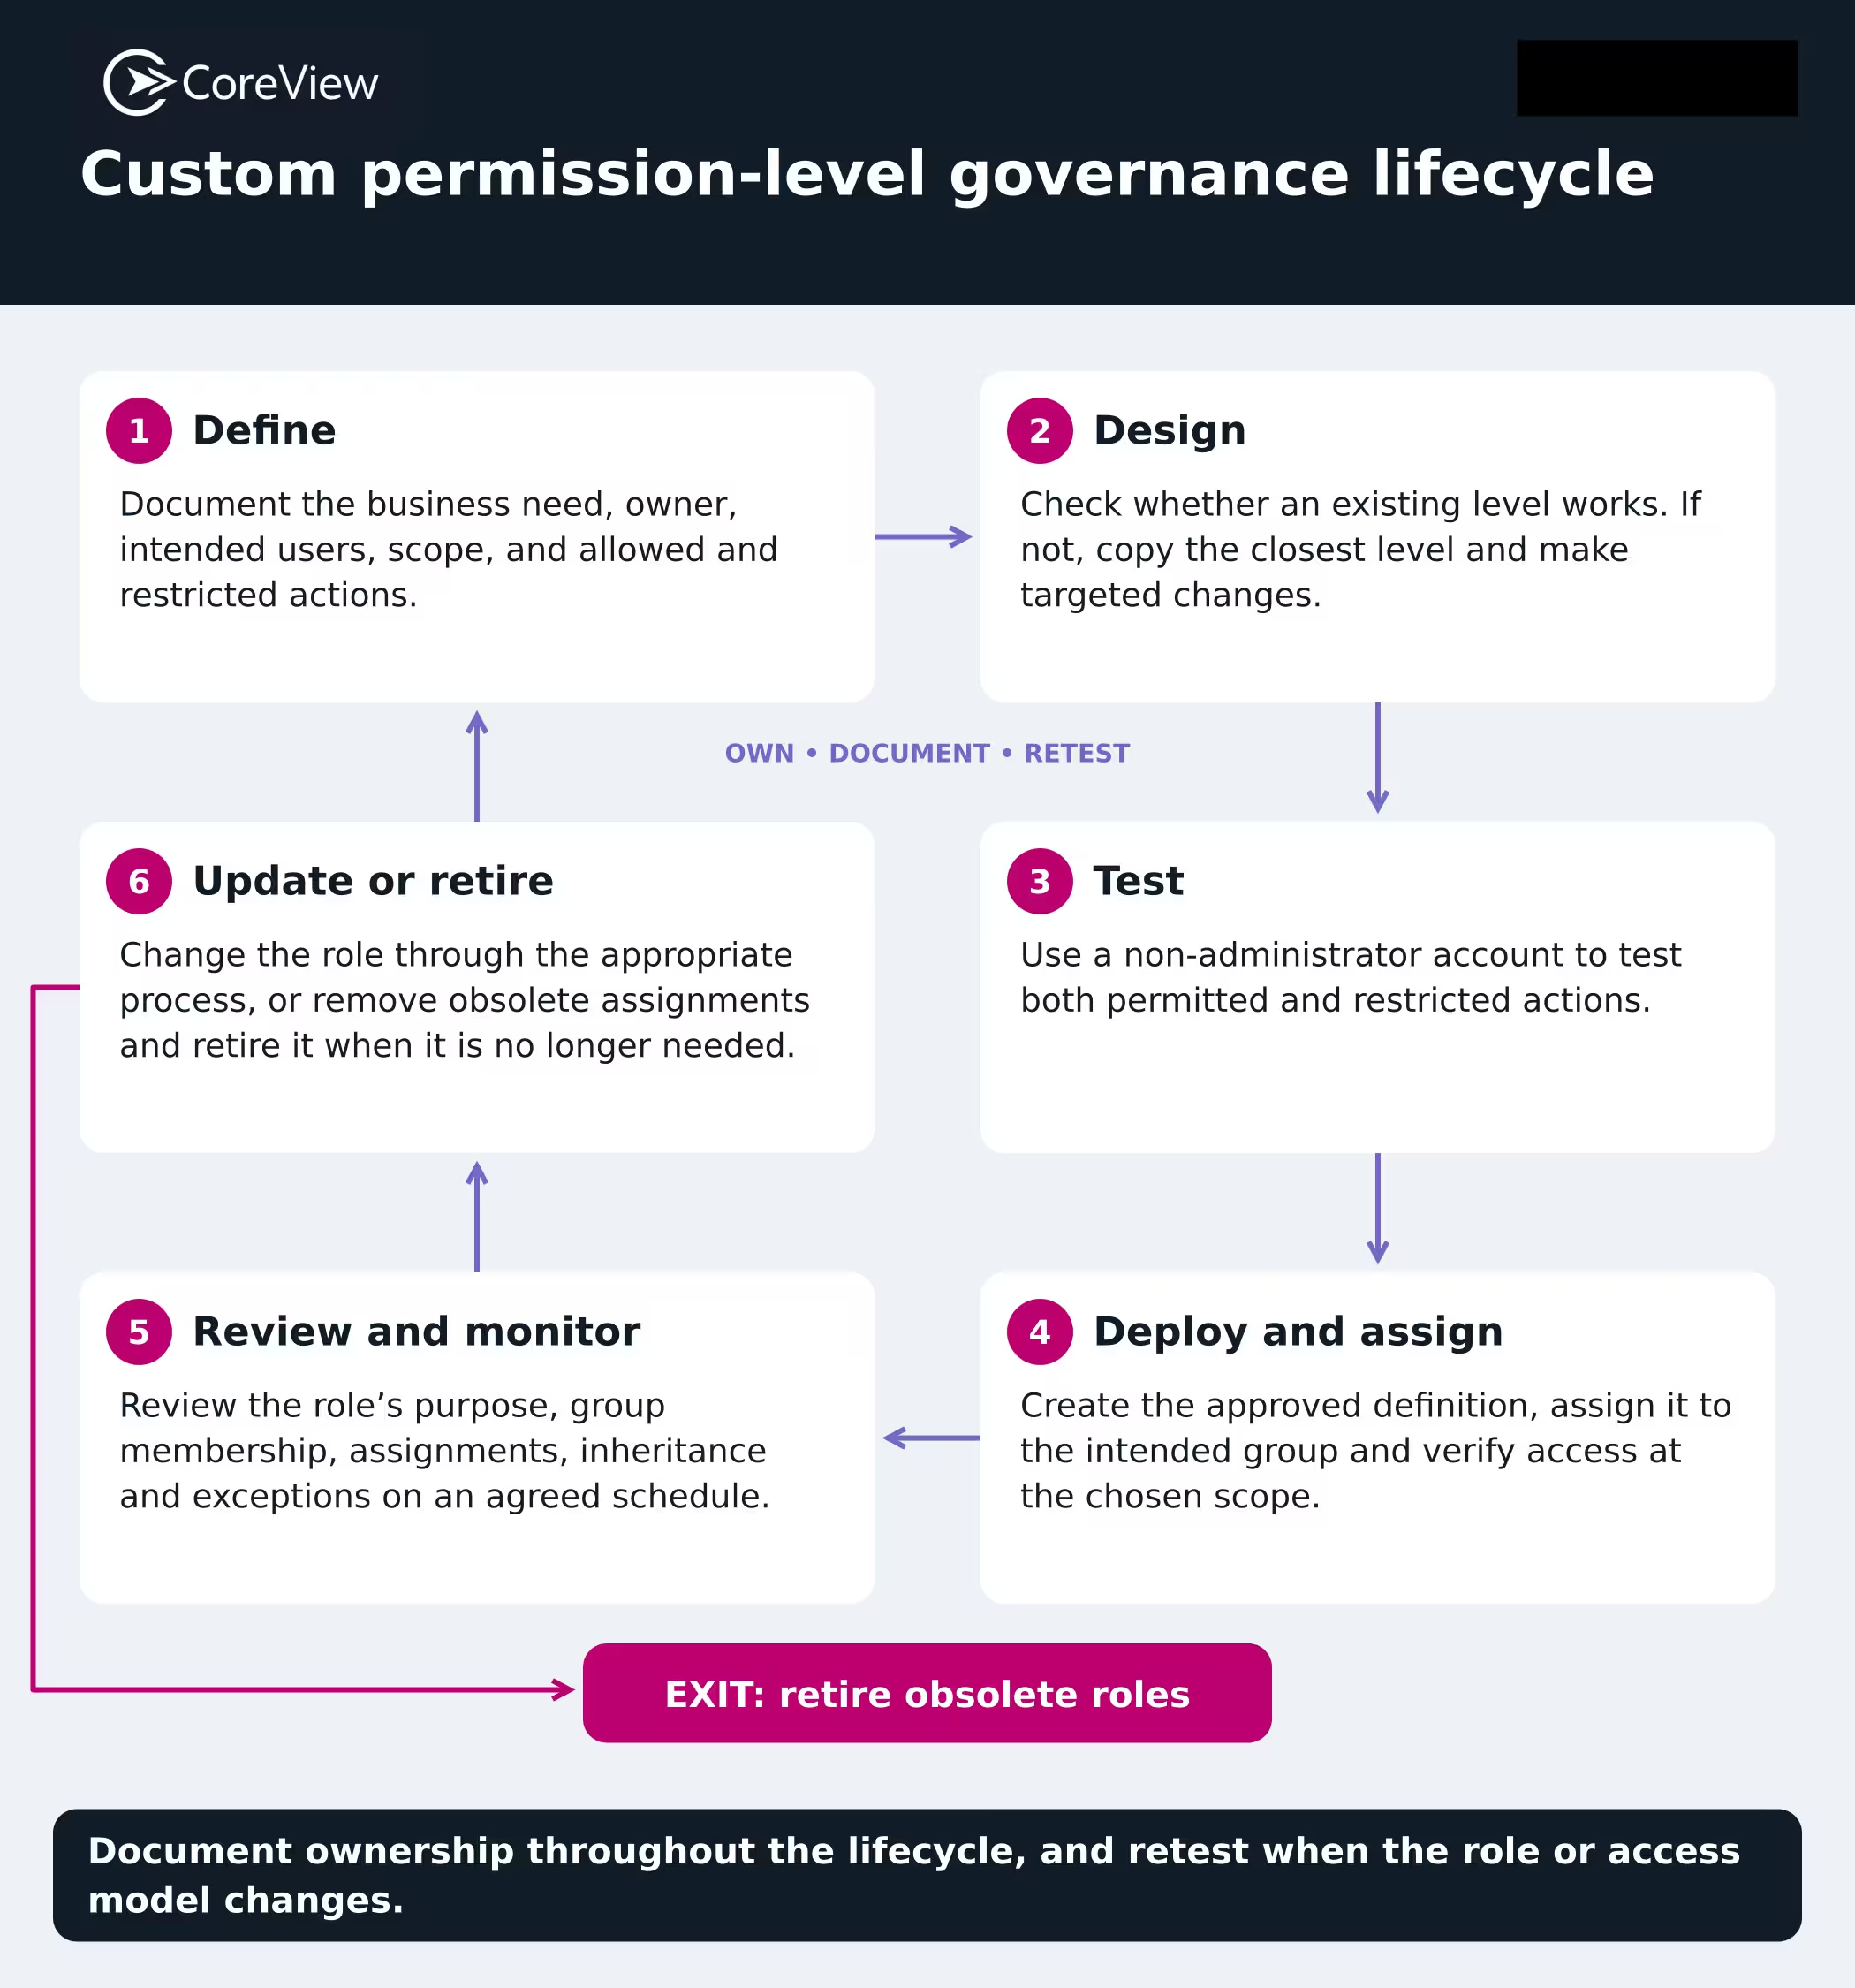
Most organizations do not need dozens of custom permission levels.
In fact, I recommend limiting customization to a small number of clearly defined business functions. The following scenarios tend to justify custom roles because they support repeatable operational requirements.
Custom permission levels usually become difficult to manage because of a familiar set of mistakes. Administrators create a custom role when group membership would solve the problem, break inheritance at the folder or item level without review, assign custom levels directly to individuals, name roles after departments instead of capabilities, deploy inconsistent definitions across sites, test only with administrator accounts, or leave roles in place after the original business need has disappeared.
A new permission level often feels like a quick win: the setup is fast, users get what they need, and everyone moves on.
The trouble surfaces later, when the next administrator finds a collection of overlapping roles with thin documentation and no obvious owner.
I have reviewed environments where no one could explain why many of the custom permission levels still existed. The roles continued to work, but the people, projects, and exceptions that originally justified them were long gone. When that happens, customization has outpaced governance.
Creating a custom permission level may take only a few minutes. Supporting it can become a long-term responsibility. Every custom role adds an object that administrators must understand, document, deploy, test, troubleshoot, audit, review, update, and retire.
The most sustainable SharePoint permission model is usually not the most granular one. It is the simplest model that meets approved business, security, and compliance requirements. Start with built-in levels, use groups for membership, preserve inheritance where practical, and customize only when a defined requirement cannot be met another way.
Custom permission levels are easy to create, but harder to govern once they spread across sites, libraries, folders, and files. CoreView helps manage what happens after those roles are created: where they are used, whether access is still appropriate, and how quickly risky permissions can be reviewed and remediated.
CoreView Control for SharePoint gives teams tenant-wide visibility into SharePoint access risk, including file- and folder-level permissions that are difficult to manage through native tools alone. This helps administrators spot where custom permission levels may be combined with risky sharing links, direct user assignments, broken inheritance, or non-inherited permissions that undermine the intended access model.
CoreView also helps organizations move from reporting to action. Teams can identify risky access patterns, assign ownership, trigger reviews, and remediate issues such as excessive sharing or direct access grants from within the platform. Every action is tracked, giving IT and compliance teams clearer evidence of who had access, what changed, and how issues were resolved.
For larger environments, CoreView also supports delegated SharePoint governance. Site owners or scoped admins can review the areas they are responsible for without needing broad tenant-wide privileges, while central IT keeps oversight through dashboards and reporting. This makes it easier to manage custom permission levels at scale without turning every access issue into a central IT ticket.
In practice, CoreView complements the creation methods covered in this article. SharePoint, PowerShell, CSOM, and REST help you create custom permission levels. CoreView helps you govern them over time by surfacing risk, supporting reviews, simplifying remediation, and producing audit-ready evidence across the tenant.
A custom permission level is a reusable set of SharePoint permissions that defines what users can do, such as view, add, edit, approve, or delete content. It does not grant access by itself; you still need to assign it to a user or, preferably, a SharePoint group.
Create a custom permission level when the built-in options, such as Read, Contribute, Edit, or Full Control, give users either too much or too little access for a repeatable business requirement. For example, you may need users to edit documents but prevent them from deleting files or versions.
Custom permission levels define what users can do. Unique permissions define where those permissions apply after inheritance is broken. If users need different capabilities, consider a custom permission level. If a specific library, folder, or item needs different access, the issue is probably inheritance or scope.
Use the SharePoint web interface for one-time changes or testing. Use PnP PowerShell when you need repeatable deployment across multiple sites. Use CSOM or the SharePoint REST API when custom permission levels need to be built into applications, provisioning workflows, or integrations.
In most cases, no. Direct assignments are harder to review, troubleshoot, document, and remove when people change roles or leave the organization. Use the associated Microsoft 365 group for standard membership on a group-connected team site; where a distinct custom role is required, assign it through a documented SharePoint group rather than directly to individual users.
Start with a small number of approved custom roles, document why each one exists, deploy them consistently, and review their assignments regularly. Tools such as CoreView can help by showing where SharePoint access risk exists, surfacing file- and folder-level permission issues, supporting remediation, and producing audit-ready evidence across the tenant.
Continue exploring the wider SharePoint permissions model.