Secure external sharing in SharePoint starts with the right boundary. This guide shows how to set tenant and site-level sharing controls, use expiration and download restrictions, and reduce exposure without blocking collaboration.
SharePoint external sharing is not just an on/off setting. It is a layered control model that starts with a tenant-wide maximum, then gets refined at the site collection level based on the sensitivity of the content and the type of collaboration each site supports. In this article I’ll explain how to choose between anonymous, authenticated, existing guest, and internal-only sharing models, then shows how to apply those settings through the SharePoint Admin Center or PowerShell.
I also cover the controls that make external sharing safer in practice, including guest expiration, anonymous link expiration, and download restrictions. Just as importantly, I’ll look at why admins should not treat sharing setup as a one-time task. Site exceptions accumulate over time, native reporting is limited, and ongoing review is essential if you want SharePoint sharing to stay aligned with security policy
Our recent CoreView 2026 State of Microsoft Security found that 68% of IT leaders flag anonymous SharePoint sharing links as a security risk, and 76% are concerned AI will surface confidential files their teams didn't know were exposed. This is seen as hindering the roll out of things like Co-pilot across Microsoft 365 environments. Now more than ever for IT and security teams, secure file sharing and tight external access policies are a top priority. In this blog I’ll walk through the different ways to enable and configure secure sharing for SharePoint.
When it comes to best practice within SharePoint, I wouldn’t enable SharePoint external sharing until I’d decided the boundary first. The safest path for this is to set the tenant-wide policy, then configure site collections with the right access level, expiration, and download controls for the work that site actually supports. While tenant settings provide a framework, they might not address the specific needs of certain groups and departments within the organization. That’s why Microsoft allows for tenant settings to be overridden at the site level. Individual sites or collections can have customized sharing settings, tailored to their specific needs.
If you need to enable or change external sharing for a SharePoint site or site collection, start in the SharePoint Admin Center. Set the tenant-wide maximum first, then tune the site collection so the actual sharing experience matches the content, the audience, and the sensitivity of that site.
Enabling external sharing for a SharePoint site is a two-step job. First, you set the tenant-wide policy that defines the maximum sharing level allowed in SharePoint Online and OneDrive. Then you configure the individual site collection so its settings reflect the actual collaboration need.
If you only need the shortest path, it looks like this:
This order matters because the tenant-wide setting acts as the ceiling. If the site-level option you expect to see is missing, the tenant-wide policy is usually the reason.
When admins look for a site-level external sharing setting in SharePoint Online, the control they usually need is the site collection sharing setting. That’s the setting managed in the SharePoint Admin Center under Active sites, and it’s also the setting configured with Set-SPOSite.
boSome sharing behaviors can still be adjusted within the site itself, such as how members are allowed to share with guests. But the broader external sharing policy still sits at the site collection level. In practice, that means the safest order is to check the tenant-wide setting first, then the site collection setting, then any tighter site-specific sharing controls.
Tenant settings in SharePoint and OneDrive form the basis for data sharing within an organization. They determine who can access which data and for how long. Configuring these tenant settings in line with company guidelines ensures controlled and secure data sharing. However, it’s not enough to just set them up and forget about them. Regular monitoring ensures these settings don’t change over time, either accidentally or maliciously.
IMPORTANT: Every time a new team is created in Microsoft Teams, Microsoft 365 automatically sets up a new site collection to facilitate document collaboration. So, while this article doesn’t explicitly focus on Microsoft Teams and Teams governance, many of the configurations and settings for SharePoint directly influence Teams and impact the broader Microsoft 365 environment.
While tenant settings provide a framework, they might not address the specific needs of certain groups and departments within the organization. That’s why Microsoft allows for tenant settings to be overridden at the site level. Individual sites or collections can have customized sharing settings, tailored to their specific needs.
Here are some examples below.
This is why the cleanest operating model is usually a defensible tenant-wide baseline with tightly scoped site collection exceptions.
Note: M365 tenant settings require monitoring and remediation
Customizable SharePoint site settings make SharePoint and OneDrive cornerstones for collaboration. However, organizations must balance the ease of sharing with data security protocols. These unique SharePoint site settings pose certain challenges like ensuring consistent application of security policies across all sites, managing permissions effectively to prevent unauthorized access, balancing user convenience with compliance requirements, and handling the complexity of site customization and governance without compromising data integrity and security. Organizations need a system to continuously monitor these settings. This system should be able to detect anomalies or deviations from the standard. If any irregularities are found, immediate remediation actions should be implemented to correct them.
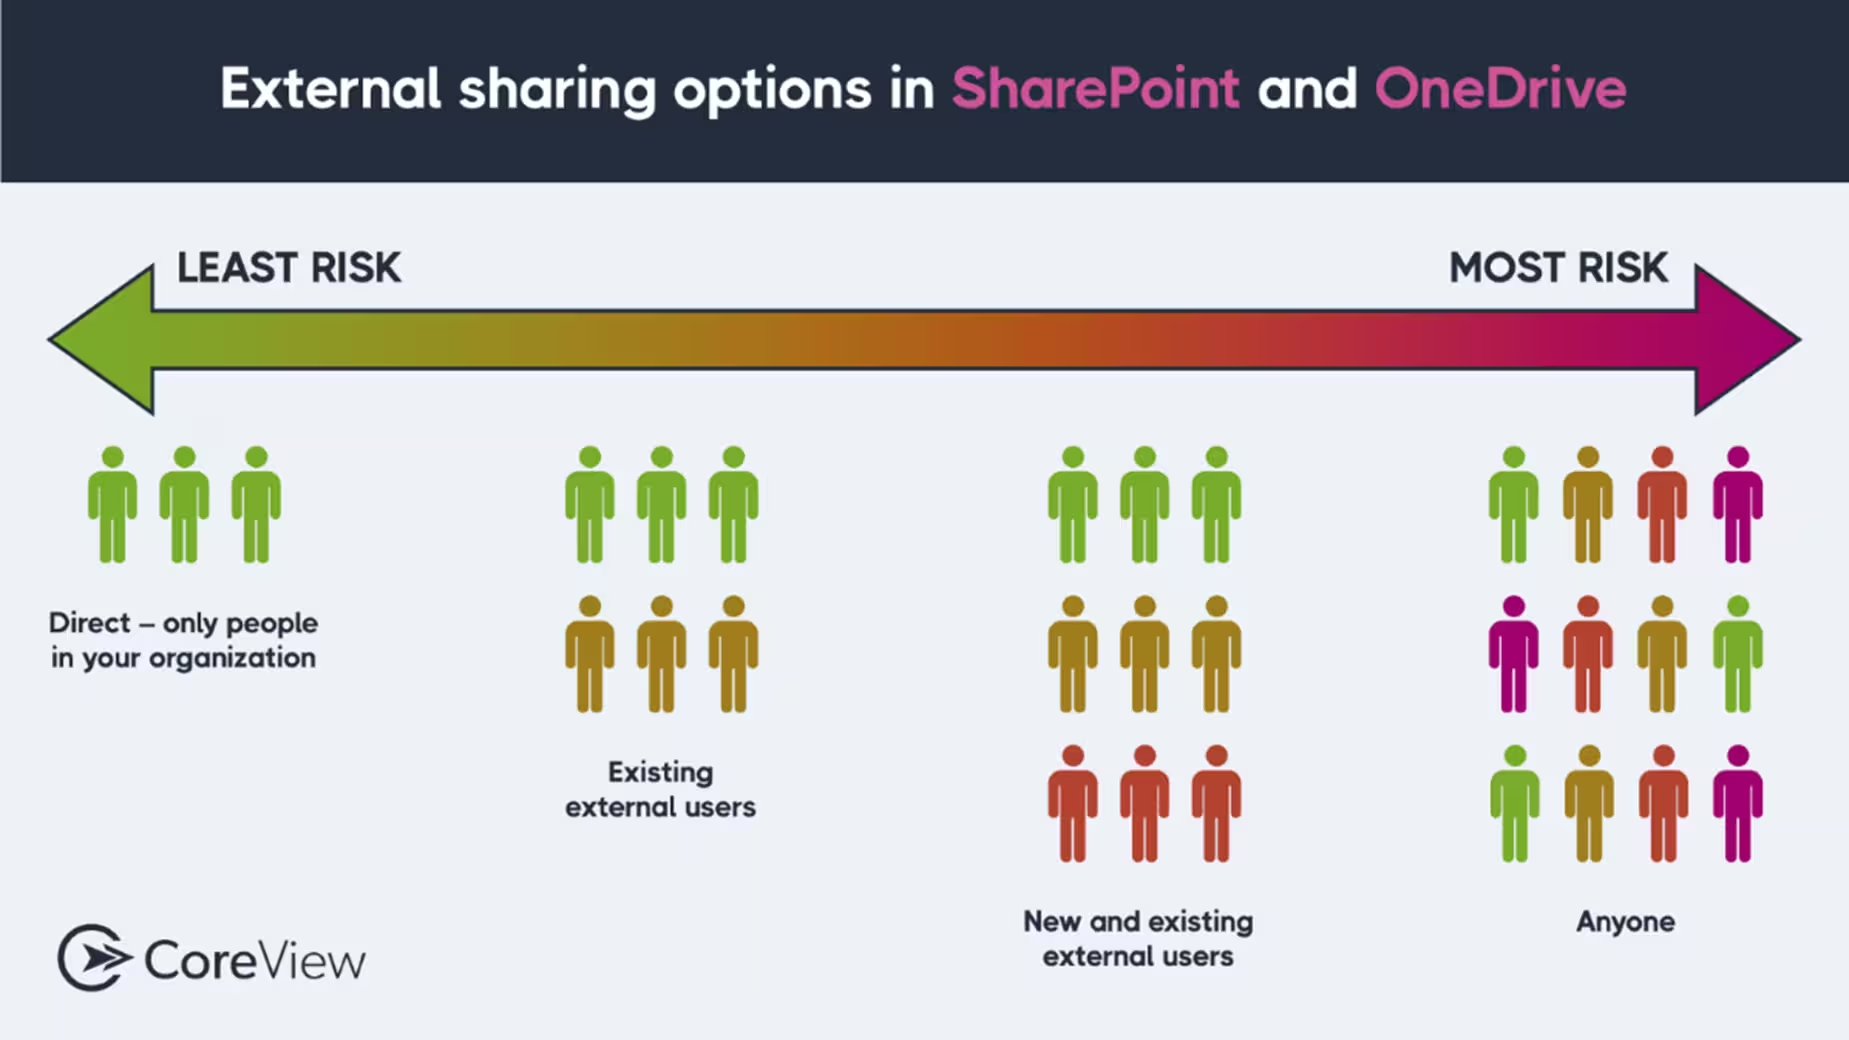
SharePoint external sharing settings are not all doing the same thing. Each option reflects a different balance between convenience and identity control, so choosing the right access level matters as much as enabling sharing in the first place.
SharePoint Online offers a range of sharing capabilities, allowing organizations to collaborate with people inside and outside their company. Your sharing practices should always align with your security policies.
To help you choose the right sharing type based on the sensitivity of the content and the desired audience, here’s a breakdown of the external sharing options:
This option enables sharing with users who don’t have a Microsoft account. Users receive a link granting access without needing to sign in. It’s ideal for sharing a document or folder with a broad audience without concern over who accesses it, similar to “public” sharing.
This is the least secure option. And, since anyone with the link can access the content, authentication is not required.
This option allows sharing with users who possess a Microsoft account (e.g., Office 365, Outlook.com, Hotmail, or Xbox). This allows for sharing content with specific individuals outside your organization and ensuring only they can access it. This option is more secure than Anonymous Sharing since it requires users to authenticate with a Microsoft account.
This option allows sharing only with external users who have been previously invited to collaborate on your SharePoint Online sites. Use this option for sharing content with external users who have already been granted access to your SharePoint content.
Similarly to new and existing external users, this type of sharing requires account authorization. However, it’s the most secure type of external sharing since it allows control over which users can access the content.
This option allows content only to be shared with users within your organization. It’s the most secure option since it completely blocks external sharing.
Configuring tenant-wide external sharing in the admin center is the first step because it defines what any SharePoint site collection is allowed to do later. If you need to enable external sharing safely, this is where the decision starts.
This establishes the maximum sharing boundary for the tenant. If your team is reviewing broader Microsoft 365 control at the same time, this is also a natural internal-link point for configuration management for Microsoft 365 governance.
Follow this step-by-step process:
Want to define the outer limits of sharing across your Microsoft 365 tenant? This quick video shows how to configure the SharePoint tenant-wide sharing policy, including external sharing levels, default permissions, and more granular external-sharing settings
Tenant-wide external sharing settings only define what is allowed. Default link settings shape what users actually do most often. This is one of those settings that quietly drives behavior. If the default is broader than most users need, many users will take it simply because it is there.
Important note: Site collection settings can be more restrictive than tenant-wide settings, but not less restrictive.
Follow this step-by-step process:
Tenant defaults are often the core driver of user behavior because most users do not stop to redesign the sharing model every time they send a file. They use the option SharePoint puts in front of them. That means default link type, default permission, expiration behavior, and the sharing experience you expose at tenant level often shape day-to-day sharing more than written policy does. If the default is broader than most users need, many will simply accept it and move on. In other words, defaults do not just reflect policy; they become behavior.
Changing external sharing for a specific SharePoint site collection is where policy becomes practical. Once the tenant-wide boundary is in place, the site collection is where you decide how open or how controlled that single collaboration space should be.
This is where context matters. A project workspace may need authenticated external users. A more sensitive site may allow only existing guests. A confidential site may need external sharing turned off entirely.
Follow this step-by-step process:
Sharing policy alone doesn’t always provide you with enough control. Advanced settings let you shape how sharing behaves within the site collection you’ve selected.
This extra step is often where admins bring everyday sharing behavior back in line with what the site is actually meant to support.
Follow this step-by-step process:
Not every SharePoint site should follow the same sharing rules. This quick video shows how to change sharing settings at the site level so you can apply the right external-sharing policy, default link type, and default permissions for a specific site or site collection.
From an admin perspective, the broad sharing choices in SharePoint have looked fairly similar for years. The real shift has been in the programmatic side: more site-level control, more granular overrides, and more room to handle exceptions without relying entirely on tenant-wide settings.
With that in mind, here’s how configuring SharePoint site collection sharing with PowerShell can be helpful when you need repeatability, cleaner validation, or a way to manage settings that are awkward to review one site at a time in the interface.
To set the sharing mode for a site collection with PowerShell, use Set-SPOSite and assign the SharingCapability value you want.
# Set the sharing capability you want to assign
$SharingCapability = ExistingExternalUserSharingOnly

# Apply it to the target site collection
Set-SPOSite -Identity $url -SharingCapability $SharingCapability
In this example, $url should contain the URL of the site collection you want to manage.
When you use SharingCapability in PowerShell, the values map to the SharePoint interface as follows:
If you already know the state you want, this is one of the more direct ways to apply settings consistently across site collections.
Viewing site collection sharing settings with PowerShell is useful because the admin portal does not give you a simple built-in way to report on every sharing exception across your environment.
Use this command to inspect a specific site collection:
$url = Read-Host "Please insert the URL of the site collection you would like to check"

Get-SPOSite -Identity $url | Select-Object Url, SharingCapability
Once site collections begin to diverge from one another, this kind of direct inspection becomes part of normal administration rather than a one-off troubleshooting step.
Managing guest access expiration and anonymous link expiration in SharePoint is one of the simplest ways to stop temporary collaboration from becoming permanent access. If outside users only need access for a project, a review period, or a defined engagement, expiration gives you a built-in limit.
The SharePoint shared link expiration days setting can help balance collaboration and security in SharePoint. By default, this setting off. Since this feature makes it easy to manage data access, it’s recommended that you enable it.
Here are a few reasons to use this feature:
SharePoint’s expiration date policy is flexible. You can set different expiration dates for various types of data or external parties. This level of granularity gives businesses more control over their data-sharing practices.
Here’s a quick overview of how the sharing expiration day works:
The settings for guest access expiration in SharePoint Online are designed to prevent external collaborators from having indefinite access to your SharePoint and OneDrive platforms. When the set expiration date arrives, the external collaborator’s access is automatically revoked.
If necessary, you can either prolong their access duration or send them another invitation.
When you set an expiration date for shared content in SharePoint, the shared link becomes inactive after the specified number of days. This means that once the link expires, users can no longer access the content through that link.
Before the link expires, SharePoint sends a notification to the person who shared the content, allowing them to extend the expiration date if needed.
The expiration setting primarily applies to “Anyone” links (also known as anonymous access links). However, administrators can also enforce expiration for “New and existing guests sharing links.”
Like the sharing policy setting, Microsoft 365 provides a tenant setting that allows you to configure sharing expiration days for SharePoint and OneDrive.
To set up the expiration for external users in SharePoint Online and OneDrive for Business, follow the steps below:
Please note that after adjusting these settings, it might take up to 24 hours for the changes to be visible. These changes will impact both SharePoint Online and OneDrive. Additionally, the setting will only affect guest users invited after this feature has been activated.
According to Microsoft’s official guidelines:
“The guest expiration policy only applies to guests who use sharing links or guests who have direct permissions to a SharePoint site after the guest policy is enabled. The guest policy does not apply to guest users that have pre-existing permissions or access through a sharing link before the guest expiration policy is applied.”
IMPORTANT: If you’ve enabled the “Anyone,” “New and existing guest,” or “Existing guests only” sharing option, the expiration of the sharing link is determined by the “Expiration of guest access” configuration. This is visible under the “Advanced setting for external sharing” section on the same settings page. It’s important to remember that this setting applies to both SharePoint Online and OneDrive for Business.
Changing guest expiration at the site collection level lets you make one site more restrictive than the broader tenant baseline when the content calls for it.
IMPORTANT: You cannot configure site-level link expiration settings to be less restrictive than your tenant-wide settings.
PowerShell is useful when you want to set or validate expiration values without opening each site collection in the admin center.
To change guest expiration:
$expirationDays = Read-Host "Insert a value between 30 and 730"

Set-SPOSite -Identity $url -ExternalUserExpirationInDays $expirationDays
To change anonymous link expiration:
$AnonymousLinkExpirationInDays = Read-Host "Please insert a value between 1-730"

Set-SPOSite -Identity $url -AnonymousLinkExpirationInDays $AnonymousLinkExpirationInDays
Viewing expiration settings with PowerShell helps when you need to confirm what has actually been applied to a site collection rather than assume the policy is in place.
Use:
Get-SPOSite -Identity $url | Select-Object Url, SharingCapability, ExternalUserExpirationInDays, AnonymousLinkExpirationInDays
This is another area where native reporting is limited, so direct inspection is often the more reliable path.
Preventing the download of SharePoint files is of paramount importance for the following reasons:
Microsoft 365 provides several options to prevent users from downloading files. In the following section, we’ll explore the two primary solutions offered by SharePoint, without the need for other solutions such as IRM, DLP, or Conditional Access Policies.
Note: Please note that to use the “Restrict Downloading” and “Restrict Downloading - Advanced Settings” values, you must have the SharePoint advanced management P1/P2 licenses available in your Microsoft 365 tenant. Without these licenses, you won't be able to set both the BlockDownloadPolicy and the additional settings to fine-tune it.
File download permissions can be managed by the user during the link creation or can be forced by the administrator. Let’s explore both methods.
Note: to apply the Block Download policy and its related settings, you must have a “SharePoint advanced management” license.
Need to share a file without making it easy to download, copy, or print? This short video explains how to turn on Block download during SharePoint link creation so recipients can view content with tighter restrictions.
Block download during link creation lets a user share content for viewing without giving the recipient the usual options to download, copy, or print it.
Follow the steps below to enable the “Block download” feature:
Recipients will receive a message indicating that they can view, but not download, the file.
If you want to enforce download restrictions across an entire site collection, PowerShell is required because Microsoft does not expose this control through the web interface.
Use:
Set-SPOSite -Identity <SiteURL> -BlockDownloadPolicy $true
Example:
Set-SPOSite -Identity https://contoso.sharepoint.com/sites/research -BlockDownloadPolicy $true
This applies the download block across shared content in that site collection.
Important: BlockDownloadPolicy and the related advanced restriction settings require SharePoint advanced management licensing.
PowerShell also exposes additional parameters that let you refine how site collection-wide download restrictions behave.
These include:
These settings allow exceptions for site owners or specified groups, or let you mark the site as read-only in addition to blocking downloads.
Viewing download restriction settings with PowerShell is important because there is no native report that clearly shows which site collections have download restrictions applied.
For a specific site:
Get-SPOSite -Identity $url | Select-Object Url, BlockDownloadPolicy
Across all site collections:
$sites = Get-SPOSite -Limit All

foreach ($site in $sites) {
  Get-SPOSite -Identity $site.Url | Select-Object Url, BlockDownloadPolicy
}
If you’re managing a large SharePoint environment, this kind of verification quickly becomes operationally necessary.
Tightening sharing controls on sensitive SharePoint sites usually means going beyond the default sharing modes. On sites with more confidential content, it often makes sense to remove broad sharing choices and narrow down who can initiate external sharing in the first place.
The “Only people in your organization” sharing policy is the most restrictive permission that can be applied by the admin portal at a tenant or site level. However, you might need to further restrict this policy for specific sites to prevent users from inadvertently sharing a document with a large audience.
Microsoft 365 offers an additional option to fine-tune your sharing policy with the “DisableCompanySharingLinks” setting, which accepts the following values: Unknown, Disable, Enable.
With this setting, you can remove the “Only people in your organization” sharing button from the user’s sharing interface. As a result, users won’t be able to create a link to share with anyone in your organization.
This configuration can be particularly useful for sites with sensitive labels or those requiring more control, such as the board site.
Please note, Microsoft does not provide a way to adjust this setting via the admin center. The only method to do this is through PowerShell.
Use the following command to disable company-wide sharing link:
$url = Read-Host "type the url of the site collection you would like to manage"

Set-SPOSite -Identity $url -DisableCompanyWideSharingLinks Disabled
After this change, the default sharing method becomes Specific people.
This is especially useful for sites where even wide internal sharing would be too permissive.
Please note that this setting only applies to Guest/Anonymous sharing. Also, if you enable this setting, members can still share with other internal users.
To configure this option, follow the steps below:
Here’s the PowerShell command to set sharing permissions to “Disable sharing for non-owners” in SharePoint Online:
Best practices for SharePoint external sharing are mostly about discipline, not just configuration. The point is not to enable collaboration once. It is to make sure the settings still match the reason the site exists, the audience it serves, and the level of control the organization needs.
A tenant-wide baseline gives you a starting point that is consistent across the environment.
From there, site collection settings can tighten the model where needed. That is usually safer than letting every site decide its own default state.
Different sites need different controls.
A board site, an HR site, and a temporary partner workspace do not need the same level of openness. In practice, the safest pattern is usually the least permissive model that still lets the work happen.
Expiration settings and download restrictions are most useful when the collaboration need is temporary, or when viewing is acceptable but taking a local copy is not.
Used well, they keep the sharing model closer to the business need and reduce stale access over time.
The admin center is good for making changes. It is less useful when you need to understand how many exceptions exist across your environment, or whether settings are still aligned with policy.
That is why PowerShell becomes part of the review process, not just the configuration process.
Site-level exceptions tend to accumulate quietly.
A setting that made sense for one project, vendor, or collaboration event can remain in place long after the reason for it has disappeared. Regular review matters if you want external sharing controls to stay intentional instead of drifting over time.
If you’re looking at external sharing as part of a wider monitoring effort, this section can naturally link to security events to monitor in Microsoft 365.
The most common mistake I see admins make with site collection external sharing is treating it as a one-time setup task. They choose the right setting for the project or site at the time, then move on, assuming the control will remain appropriate as the site evolves. In practice, that is where exposure starts to creep in. Site purpose changes, external collaboration expands, membership shifts, and older exceptions remain in place longer than anyone intended. The real issue is usually not the initial configuration. It is failing to review and monitor that configuration over time, especially in environments where external sharing is common and site-level exceptions accumulate.
Governing SharePoint external sharing at scale gets harder the moment you move beyond a small number of sites. The native admin controls are useful for setting boundaries at the tenant and site collection level, but they do not give teams a practical way to see where risky access is already active across files and folders, who needs to review it, and how to prove that action was taken.
That is the gap CoreView Control for SharePoint is built to address.
Where the native model focuses on settings at the site boundary, CoreView Control for SharePoint extends visibility and governance down to the item level. That matters because external sharing risk does not stay neatly contained at the site level. Over time, it accumulates through direct shares, unique permissions, older access decisions, and file-level exceptions that are hard to find through manual review alone.
For organizations trying to keep external sharing secure without slowing collaboration down, that changes the operating model in a useful way. Instead of treating external sharing as a series of one-off admin checks, teams can work from a more complete governance loop:
That broader loop is important because IT teams usually cannot make every access decision on their own. As John Stevenson put it in the attached discussion, “IT can't know whether or not Pete should be allowed to see this file or that folder.” In practice, that means strong governance depends on visibility plus delegation, not visibility alone.
This is also where CoreView Control for SharePoint becomes more relevant than a simple report. According to the product playbook, it brings together risk-ranked visibility into files and folders with non-inherited permissions, integrated governance workflows, item-level policy support, and executive and admin dashboards. For external sharing governance, that gives organizations a more usable way to identify high-risk exposure, route ownership to the right people, and keep a record of the review and remediation process over time.
That matters for more than security alone. The supporting SharePoint governance materials also point to the operational problem underneath it: risky access tends to stay active longer when teams cannot see exactly where to act first. In real environments, the challenge is rarely knowing that SharePoint may contain exposure. The harder part is finding the files, folders, and sites that deserve attention before an audit, an incident, or an AI rollout forces the issue.
If your organization is already using tenant-wide and site collection-level controls to define what SharePoint is allowed to do, CoreView Control for SharePoint fits as the next layer down. It helps teams govern how those decisions are actually playing out across the content itself, especially where external sharing, unique permissions, and delegated review responsibilities start to create blind spots.
If external sharing is part of a broader governance effort, this is also a natural place to connect readers to related guidance on how to manage SharePoint external sharing settings in Microsoft 365.
To enable external sharing for a SharePoint site, start in the SharePoint Admin Center and set the tenant-wide sharing policy first under Policies > Sharing. That tenant setting acts as the maximum boundary for what any site collection can allow. After that, go to Sites > Active sites, select the site collection, click Sharing, and choose the sharing level that fits that site’s collaboration needs.
This two-step order matters because site collections cannot be less restrictive than the tenant allows. If a sharing option is missing at the site level, the tenant-wide setting is usually the reason.
Tenant-level settings define the outer sharing boundary for SharePoint Online and OneDrive across the whole Microsoft 365 environment. They set the maximum level of external sharing, default link behavior, and broader controls that shape what users are allowed to do.
Site-level, or more accurately site collection-level, settings let you apply tighter controls for specific collaboration spaces. That means a tenant might allow authenticated guest sharing overall, while a board or HR site collection is locked down further with stricter access, shorter expiration, or no external sharing at all.
The most secure SharePoint external sharing option is Only people in your organization, because it blocks external sharing completely. If external collaboration is required, Existing external users is usually the most controlled option because it limits sharing to guests who have already been invited and approved.
By contrast, Anyone links are the least secure because they do not require sign-in and can be used by anyone who has the link. The right choice depends on the sensitivity of the content, but the safest pattern is usually the least permissive option that still allows the work to happen.
You can configure guest access expiration in the SharePoint Admin Center under Policies > Sharing > More external sharing settings. There, you can enable automatic guest expiration and choose the number of days after which guest access will expire. This helps ensure temporary collaboration does not become permanent access.
For site-specific controls or validation, PowerShell can be used with parameters such as ExternalUserExpirationInDays and AnonymousLinkExpirationInDays in Set-SPOSite. The article also notes that tenant-wide settings act as the ceiling, so site collection settings can be more restrictive, but not less restrictive.
At the user level, SharePoint allows Block download during link creation. When someone shares a file, they can open the sharing settings, choose Can view, and turn on Block download so recipients can view the file without downloading, copying, or printing it.
At the site collection level, admins can enforce download restrictions with PowerShell using Set-SPOSite -BlockDownloadPolicy $true. The article notes that these controls, along with related advanced settings, require SharePoint Advanced Management licensing in the tenant.